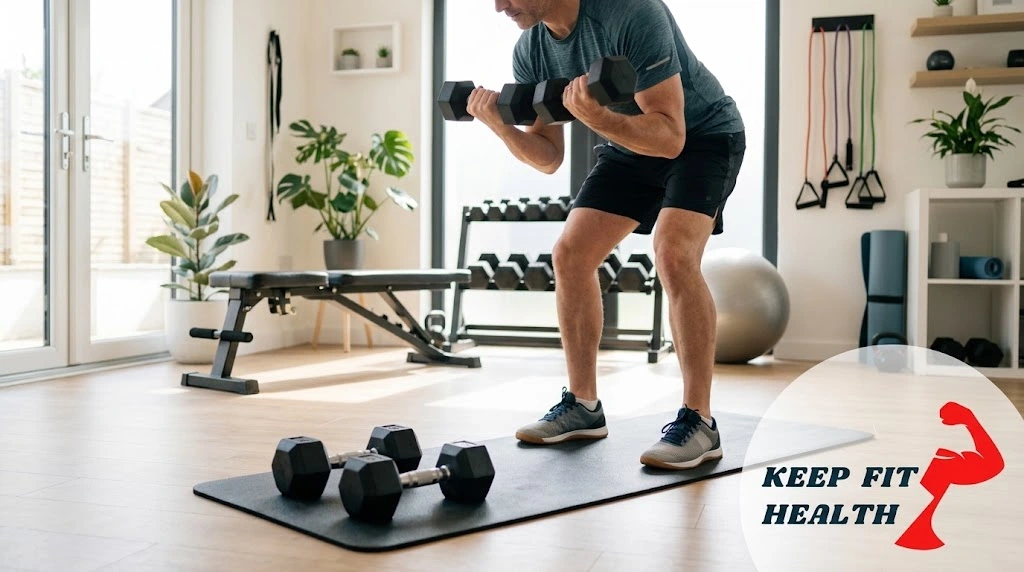
Dumbbell Workout for Beginners: Complete Home Muscle Guide

dumbbell workout for beginners

Editorial & Exercise Safety Note: The resistance training programs, kinetic cues, and volume prescriptions provided in this guide are intended strictly for educational and instructional purposes. Before beginning any new vigorous weight training regimen, consult a licensed physician or physical therapist, especially if you have a history of shoulder impingement, lower lumbar disc injuries, or cardiovascular conditions.

Starting a structured dumbbell workout for beginners is one of the most practical and scientifically proven strategies to build lean muscle, increase bone mineral density, and burn visceral fat from home. While commercial fitness culture often suggests you need complicated multi-station cable machines or Olympic barbell platforms to make serious physical progress, free weights like dumbbells offer superior biomechanical freedom. They accommodate individual joint angles, expose side-to-side muscular imbalances, and safely introduce your central nervous system to multi-planar resistance training.

Free weight training is not about lifting until you drop; it is about building motor unit recruitment and mastering movement patterns. By emphasizing mechanical tension, respecting recovery timelines, and executing fundamental human movement patterns—the squat, hinge, push, pull, and carry—a well-designed dumbbell workout for beginners transforms random home lifting into an evidence-based muscle-building engine.

Why Dumbbells Outperform Barbells and Machines for New Lifters

When entering resistance training, beginners often struggle with the rigid bar paths imposed by fixed machines and heavy barbells. Dumbbells provide distinct kinetic advantages:

Dumbbell Training Kinetic Advantages:
├── 1. Independent Limb Loading: Prevents the dominant arm/leg from masking contralateral weakness
├── 2. Joint-Friendly Freedom: Allows natural wrist, elbow, and shoulder rotation across the repetition
├── 3. Core Stabilization: Increases recruitment of obliques, transverse abdominis, and multifidus
└── 4. Safety & Fail-Safe Mechanics: Dumbbells can be safely released to the floor without getting trapped

1. Eliminating Bilateral Muscular Deficits

Most people have a dominant side. When performing a standard barbell bench press or barbell squat, the stronger side quietly absorbs up to 15% more load than the weaker side. Over months of training, this creates noticeable asymmetrical strength gaps that can lead to joint torque and overuse injuries. Because dumbbells require each limb to move its own load independently, your weaker side is forced to build equal motor control and force output.

2. Natural Multi-Planar Joint Trajectories

Barbells lock your hands and wrists into a fixed horizontal plane. For individuals with limited shoulder internal rotation or subtle wrist stiffness, pressing a straight bar can cause anterior shoulder impingement or wrist strain. Dumbbells allow your hands to move naturally from a pronated position into a neutral or semi-supinated grip, matching your unique skeletal anatomy and protecting joint capsules.
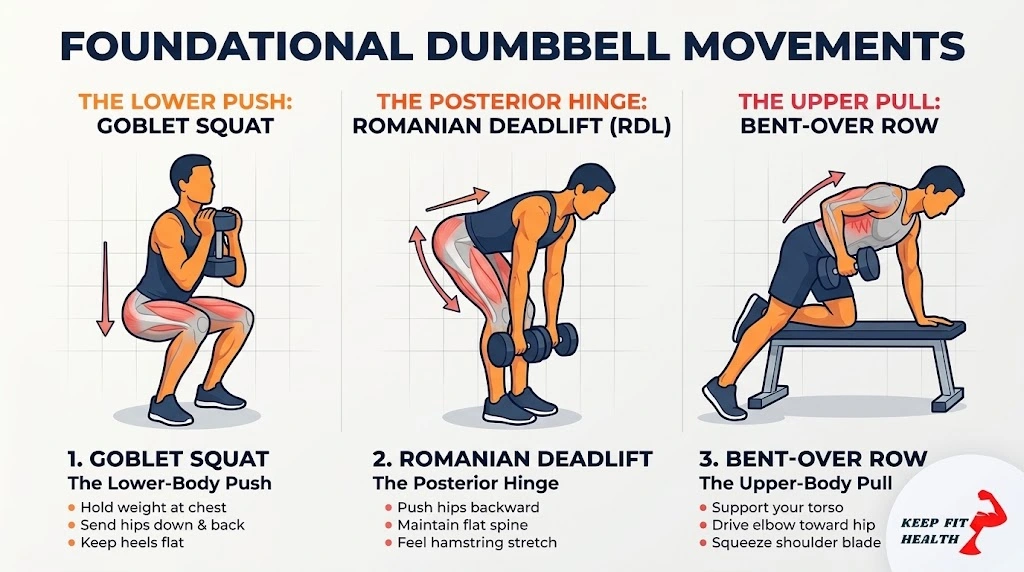
foundational movement patterns every beginner must master

The 5 Foundational Movement Patterns Every Beginner Must Master

Rather than thinking about training individual muscle heads in isolation (like doing endless sets of bicep curls), an effective routine centers on human movement patterns. Mastering these five movements ensures complete, balanced physical development.

1. The Lower-Body Push: The Dumbbell Goblet Squat

The goblet squat is the premier squatting variation for beginners. Holding a single dumbbell vertically against your sternum acts as an anterior counterbalance, allowing your torso to remain upright while keeping your hips centered between your heels.

  • Primary Muscles Recruited: Quadriceps, gluteus maximus, adductor magnus, anterior core.
  • Biomechanical Setup:
    1. Stand tall with your feet shoulder-width apart, toes flared slightly outward (15 to 30 degrees).
    2. Cup the top end of a dumbbell with both hands against your chest, keeping your elbows tucked downward like a goblet.
    3. Inhale into your belly, brace your core, and initiate the descent by breaking simultaneously at your hips and knees.
    4. Squat down until your hip crease drops parallel with or slightly below the tops of your kneecaps, keeping your heels firmly planted.
    5. Drive the floor away through your midfoot and squeeze your glutes to return to a standing position.

2. The Posterior Hinge: The Dumbbell Romanian Deadlift (RDL)

Unlike a squat where your knees bend deeply, the hinge is driven almost entirely by sending your hips backward while maintaining a soft, fixed knee angle. This targets the posterior kinetic chain, directly supporting lower back resilience.

  • Primary Muscles Recruited: Hamstrings, gluteus maximus, erector spinae, latissimus dorsi.
  • Biomechanical Setup:
    1. Stand with feet hip-width apart, holding a pair of dumbbells against the fronts of your thighs with a neutral overhand grip.
    2. Soften your knees slightly (roughly 15 to 20 degrees of bend) and lock that knee angle in place.
    3. Push your hips backward toward an imaginary wall behind you while sliding the dumbbells down the fronts of your shins.
    4. Lower the weights only until you feel a deep stretch in your hamstrings (usually right around mid-shin level). Do not round your lower back to reach lower.
    5. Squeeze your glutes and push your hips forward to stand tall.

3. The Upper-Body Horizontal Pull: Single-Arm Dumbbell Row

Developing a strong upper back balances the postural strain caused by daily sitting, computer work, and driving. Supporting one knee and hand on a sturdy bench or chair removes lumbar shear stress, letting you isolate the latissimus dorsi and rhomboids.

  • Primary Muscles Recruited: Latissimus dorsi, rhomboids, rear deltoids, middle trapezius, biceps brachii.
  • Biomechanical Setup:
    1. Place your left knee and left hand firmly on a flat bench or stable chair, keeping your torso parallel to the floor.
    2. Hold a dumbbell in your right hand, letting the arm hang straight down beneath your shoulder.
    3. Initiate the pull by driving your right elbow back toward your hip pocket, rather than pulling the weight up toward your chest.
    4. Squeeze your back muscles at the top of the repetition for a full second without rotating your shoulders or twisting your torso.
    5. Lower the weight under control over a 2-second count.

4. The Upper-Body Horizontal Push: Dumbbell Floor Press / Bench Press

If you do not have a flat workout bench at home, the floor press is an effective, shoulder-safe alternative. The floor acts as a natural depth stop, preventing your elbows from hyperextending past your ribcage and taking excessive strain off the anterior shoulder capsule.

  • Primary Muscles Recruited: Pectoralis major, anterior deltoids, triceps brachii.
  • Biomechanical Setup:
    1. Lie flat on your back on an exercise mat with your knees bent and feet flat on the floor.
    2. Hold a dumbbell in each hand with your upper arms resting on the floor at a 45-degree angle to your torso (avoid flaring your elbows straight out at 90 degrees).
    3. Exhale and press the dumbbells upward until your arms are fully extended over your chest.
    4. Lower the dumbbells slowly until your triceps gently touch the floor, pause for a moment to eliminate momentum, and press again.

5. The Overhead Vertical Press: Seated Dumbbell Shoulder Press

Pressing overhead from a seated position eliminates leg drive, ensuring your deltoids and triceps perform the work while providing back support.

  • Primary Muscles Recruited: Anterior and lateral deltoids, clavicular pectoralis, triceps, upper trapezius.
  • Biomechanical Setup:
    1. Sit on a chair or bench with your feet flat on the floor and your spine upright and neutral.
    2. Bring the dumbbells up to shoulder height with a semi-neutral grip (palms facing roughly 45 degrees inward toward each other).
    3. Press the dumbbells straight upward in a slight arc until your elbows lock out overhead.
    4. Lower the weights back to the tops of your shoulders over a controlled 2-second tempo.

The Complete 3-Day Full-Body Dumbbell Routine for Beginners

When starting out, a full-body split performed three non-consecutive days per week (e.g., Monday, Wednesday, Friday) works best. It provides frequent stimulus to all major muscle groups while allowing 48 hours of recovery between sessions for tissue remodeling and glycogen resynthesis.

Weekly Training Split Schedule:
├── Monday: Full-Body Workout A
├── Tuesday: Active Recovery / Low-Impact Walking
├── Wednesday: Full-Body Workout B
├── Thursday: Active Recovery / Mobility Focus
├── Friday: Full-Body Workout A
└── Weekend: Rest & Systematic Recovery
*(The following week, alternate: Week 2 runs B-A-B)*

Workout A (Full-Body Strength Focus)

Exercise OrderExercise NameTarget Muscle GroupsSetsRepetitionsRest Interval
1Dumbbell Goblet SquatQuadriceps, Glutes, Core38 – 1090 seconds
2Dumbbell Floor PressChest, Triceps, Shoulders38 – 1090 seconds
3Single-Arm Dumbbell RowLats, Upper Back, Biceps310 – 12 per side60 seconds
4Dumbbell Romanian DeadliftHamstrings, Posterior Chain310 – 1290 seconds
5Standing Dumbbell Bicep CurlBiceps Brachii212 – 1560 seconds
6Lying Dumbbell Tricep ExtensionTriceps (Long Head)212 – 1560 seconds

Workout B (Hypertrophy & Postural Balance Focus)

Exercise OrderExercise NameTarget Muscle GroupsSetsRepetitionsRest Interval
1Dumbbell Static Split SquatGlutes, Quads, Hamstrings38 – 10 per leg90 seconds
2Seated Dumbbell Shoulder PressDeltoids, Upper Traps38 – 1090 seconds
3Two-Arm Dumbbell Chest-Supported RowMid-Back, Rhomboids, Lats310 – 1275 seconds
4Dumbbell Glute Bridge (from floor)Gluteus Maximus, Core312 – 1560 seconds
5Dumbbell Lateral RaisesLateral Deltoids312 – 1560 seconds
6Standing Dumbbell Farmer’s WalkGrip Strength, Core, Traps340 steps60 seconds

How to Apply Progressive Overload Without Hurting Yourself

Progressive overload is the foundation of resistance training. To build muscle and strength, you must systematically increase the mechanical work your muscular tissues perform over time. However, beginners often make the mistake of adding heavy weight before their movement mechanics are fully solid.

The Safe Progression Hierarchy for Beginners:
1. Movement Competence: Complete all sets with strict, repeatable form
2. Repetition Range: Progress from the bottom of the rep range to the top (e.g., from 8 reps to 12 reps)
3. Set Volume: Add a set once recovery allows (moving from 2 sets to 3 sets)
4. Load (Weight): Increase dumbbell weight by 2.5 to 5 lbs once you hit the top rep target

The Double-Progression Method Explained

The safest way to apply progressive overload during a dumbbell workout for beginners is the double-progression method.

  • Choose a weight you can handle for 3 sets of 8 reps with good form.
  • Keep that same weight until you can perform all 3 sets for 12 clean reps.
  • Once you hit 3 sets of 12 reps, increase the weight by the smallest available increment (usually 2.5 to 5 lbs per dumbbell).
  • With the heavier weight, your reps will naturally drop back down to around 8 reps per set.
  • Repeat the process. This method ensures your joints, ligaments, and tendons adapt steadily without sudden spikes in injury risk.

Choosing Your First Dumbbell Set: Fixed Hex vs. Adjustable

Selecting the right equipment for a home gym comes down to your budget, available floor space, and training goals.

Dumbbell Equipment Selection:
├── Rubber Hex Dumbbells:
│   ├── Pros: Virtually indestructible, non-rolling design, fast to grab between sets
│   └── Cons: Requires dedicated rack space; buying multiple pairs gets expensive over time
└── Dial/Pin Adjustable Dumbbells:
    ├── Pros: Replaces 15 pairs of dumbbells in the footprint of two shoes; cost-effective
    └── Cons: Larger casing can feel bulky on tight movements; sensitive internal gears if dropped
  • Where to Start with Weight:
    • Most women new to lifting do well starting with a pair of 5 lb, 10 lb, and 15 lb dumbbells.
    • Most men new to lifting do well starting with a pair of 10 lb, 15 lb, and 25 lb dumbbells.
    • If purchasing adjustable dumbbells, look for sets that scale from 5 lbs up to 50 lbs, which can comfortably support your first two years of progressive overload.

Nutritional Foundations to Fuel Strength and Muscle Repair

Lifting weights provides the mechanical stimulus for adaptation, but muscle tissue is rebuilt during recovery through dietary amino acids, adequate calories, and proper micronutrient balance.

1. Daily Protein Requirements

To support muscle protein synthesis (MPS) and repair micro-damage created during resistance training, aim for 0.7 to 1.0 grams of dietary protein per pound of body weight (1.6 to 2.2 grams per kilogram) daily. High-quality whole-food sources include skinless chicken breast, lean ground beef, wild salmon, whole eggs, tofu, tempeh, and whey protein isolate.

2. Pre- and Post-Workout Fueling

Never lift weights while completely depleted of liver and muscular glycogen. Consuming easily digestible carbohydrates paired with a moderate protein source 60 to 90 minutes before lifting ensures steady blood glucose and elevated muscular endurance. For an in-depth breakdown of carbohydrate-to-protein timing windows and meal options, read our guide on pre workout nutrition for energy.

3. Micronutrients for Connective Tissue and Muscle Function

Resistance training increases the turnover of several key minerals and co-factors, including magnesium (for muscular contraction and relaxation), zinc (for protein synthesis), and vitamin D3 (for muscular power output and bone density). Active individuals who want to cover nutritional bases with third-party tested formulas can review our analysis on the best women’s multivitamins.

4 Common Beginner Mistakes to Avoid

Avoid these frequent errors to keep your workouts safe, consistent, and productive:

1. Lifting with Momentum and Inadequate Eccentric Control

Swinging the dumbbells using body english takes mechanical tension off the target muscle and transfers it into connective joints. Always lower the weight under control over a 2-to-3-second eccentric phase. The muscle damage that stimulates growth occurs largely during this controlled lowering portion of the lift.

2. Skipping the Warm-Up

Lifting weights with cold muscles and stiff joint capsules increases the risk of muscle strains. Spend 5 to 7 minutes before your workout doing dynamic movements: arm circles, cat-cows, bodyweight squats, and hip openers.

3. Wearing Soft, Unstable Running Shoes While Lifting

Thick, squishy running shoes with soft foam cushions are designed to absorb impact while moving forward—not provide a firm base for lifting weights. When squatting or pressing with dumbbells, soft soles compress unevenly, causing your ankles and knees to wobble. Lift in flat-soled shoes (like Converse or minimalist trainers) or simply in your socks on a clean home gym mat. If you deal with fallen arches, explore our guide on the best walking shoes for flat feet to understand how stable footwear protects the lower kinetic chain.

4. Training to Absolute Muscular Failure on Every Set

Taking every set until the dumbbell literally falls out of your hands generates excessive central nervous system fatigue without added hypertrophy benefit. As a beginner, end most work sets with 1 to 2 reps in reserve (RIR)—the point where you could perform another rep with good form if forced to, but choose to rack the weight.

Frequently Asked Questions

How heavy should my dumbbells be when starting out?

Select a weight that allows you to complete all target repetitions with good form, while feeling challenging during the final 2 to 3 reps. If your form breaks down, you swing your torso, or your joints ache, the dumbbell is too heavy. If you easily breeze through all sets without needing a rest, you can safely increase the load.

Can I build real muscle using only dumbbells at home?

Yes. Your muscle fibers do not know the difference between a high-end commercial gym machine and a simple pair of dumbbells. Muscle hypertrophy responds to mechanical tension, progressive overload, and adequate nutrition. As long as you train within 1 to 3 repetitions of muscular failure and progressively increase your reps or weight over time, dumbbells can build substantial muscle mass and functional strength.

Should I do cardio on the same days as my dumbbell workouts?

If your primary goal is building strength and muscle, perform your dumbbell workout first when your energy and nervous system are fresh, or schedule your cardio sessions on alternate recovery days. Low-impact cardiovascular exercise, like walking for lower back pain or steady-state trail walking, pairs exceptionally well with resistance training without blunting your muscular adaptations.

How long does a full-body dumbbell workout take?

A beginner full-body workout consisting of 5 to 6 exercises, performed for 3 sets each with 60 to 90 seconds of rest, typically takes 40 to 50 minutes, including a thorough dynamic warm-up.

Final Thoughts & Daily Action Plan

Building consistent strength from home does not require complicated routines or crowded gym floors. By focusing on fundamental multi-joint movements, tracking your volume, and applying progressive overload with good form, a basic dumbbell workout for beginners gives you a complete, sustainable blueprint for long-term health and functional fitness.

Commit to three sessions per week, pair your training with whole-food nutrition, and prioritize your recovery between workouts.

For more evidence-based strength guides, joint recovery protocols, and nutrition breakdowns, explore our complete library across Keep Fit Health, and connect directly with Dorene Lambert on Facebook for weekly form tutorials and coaching advice.
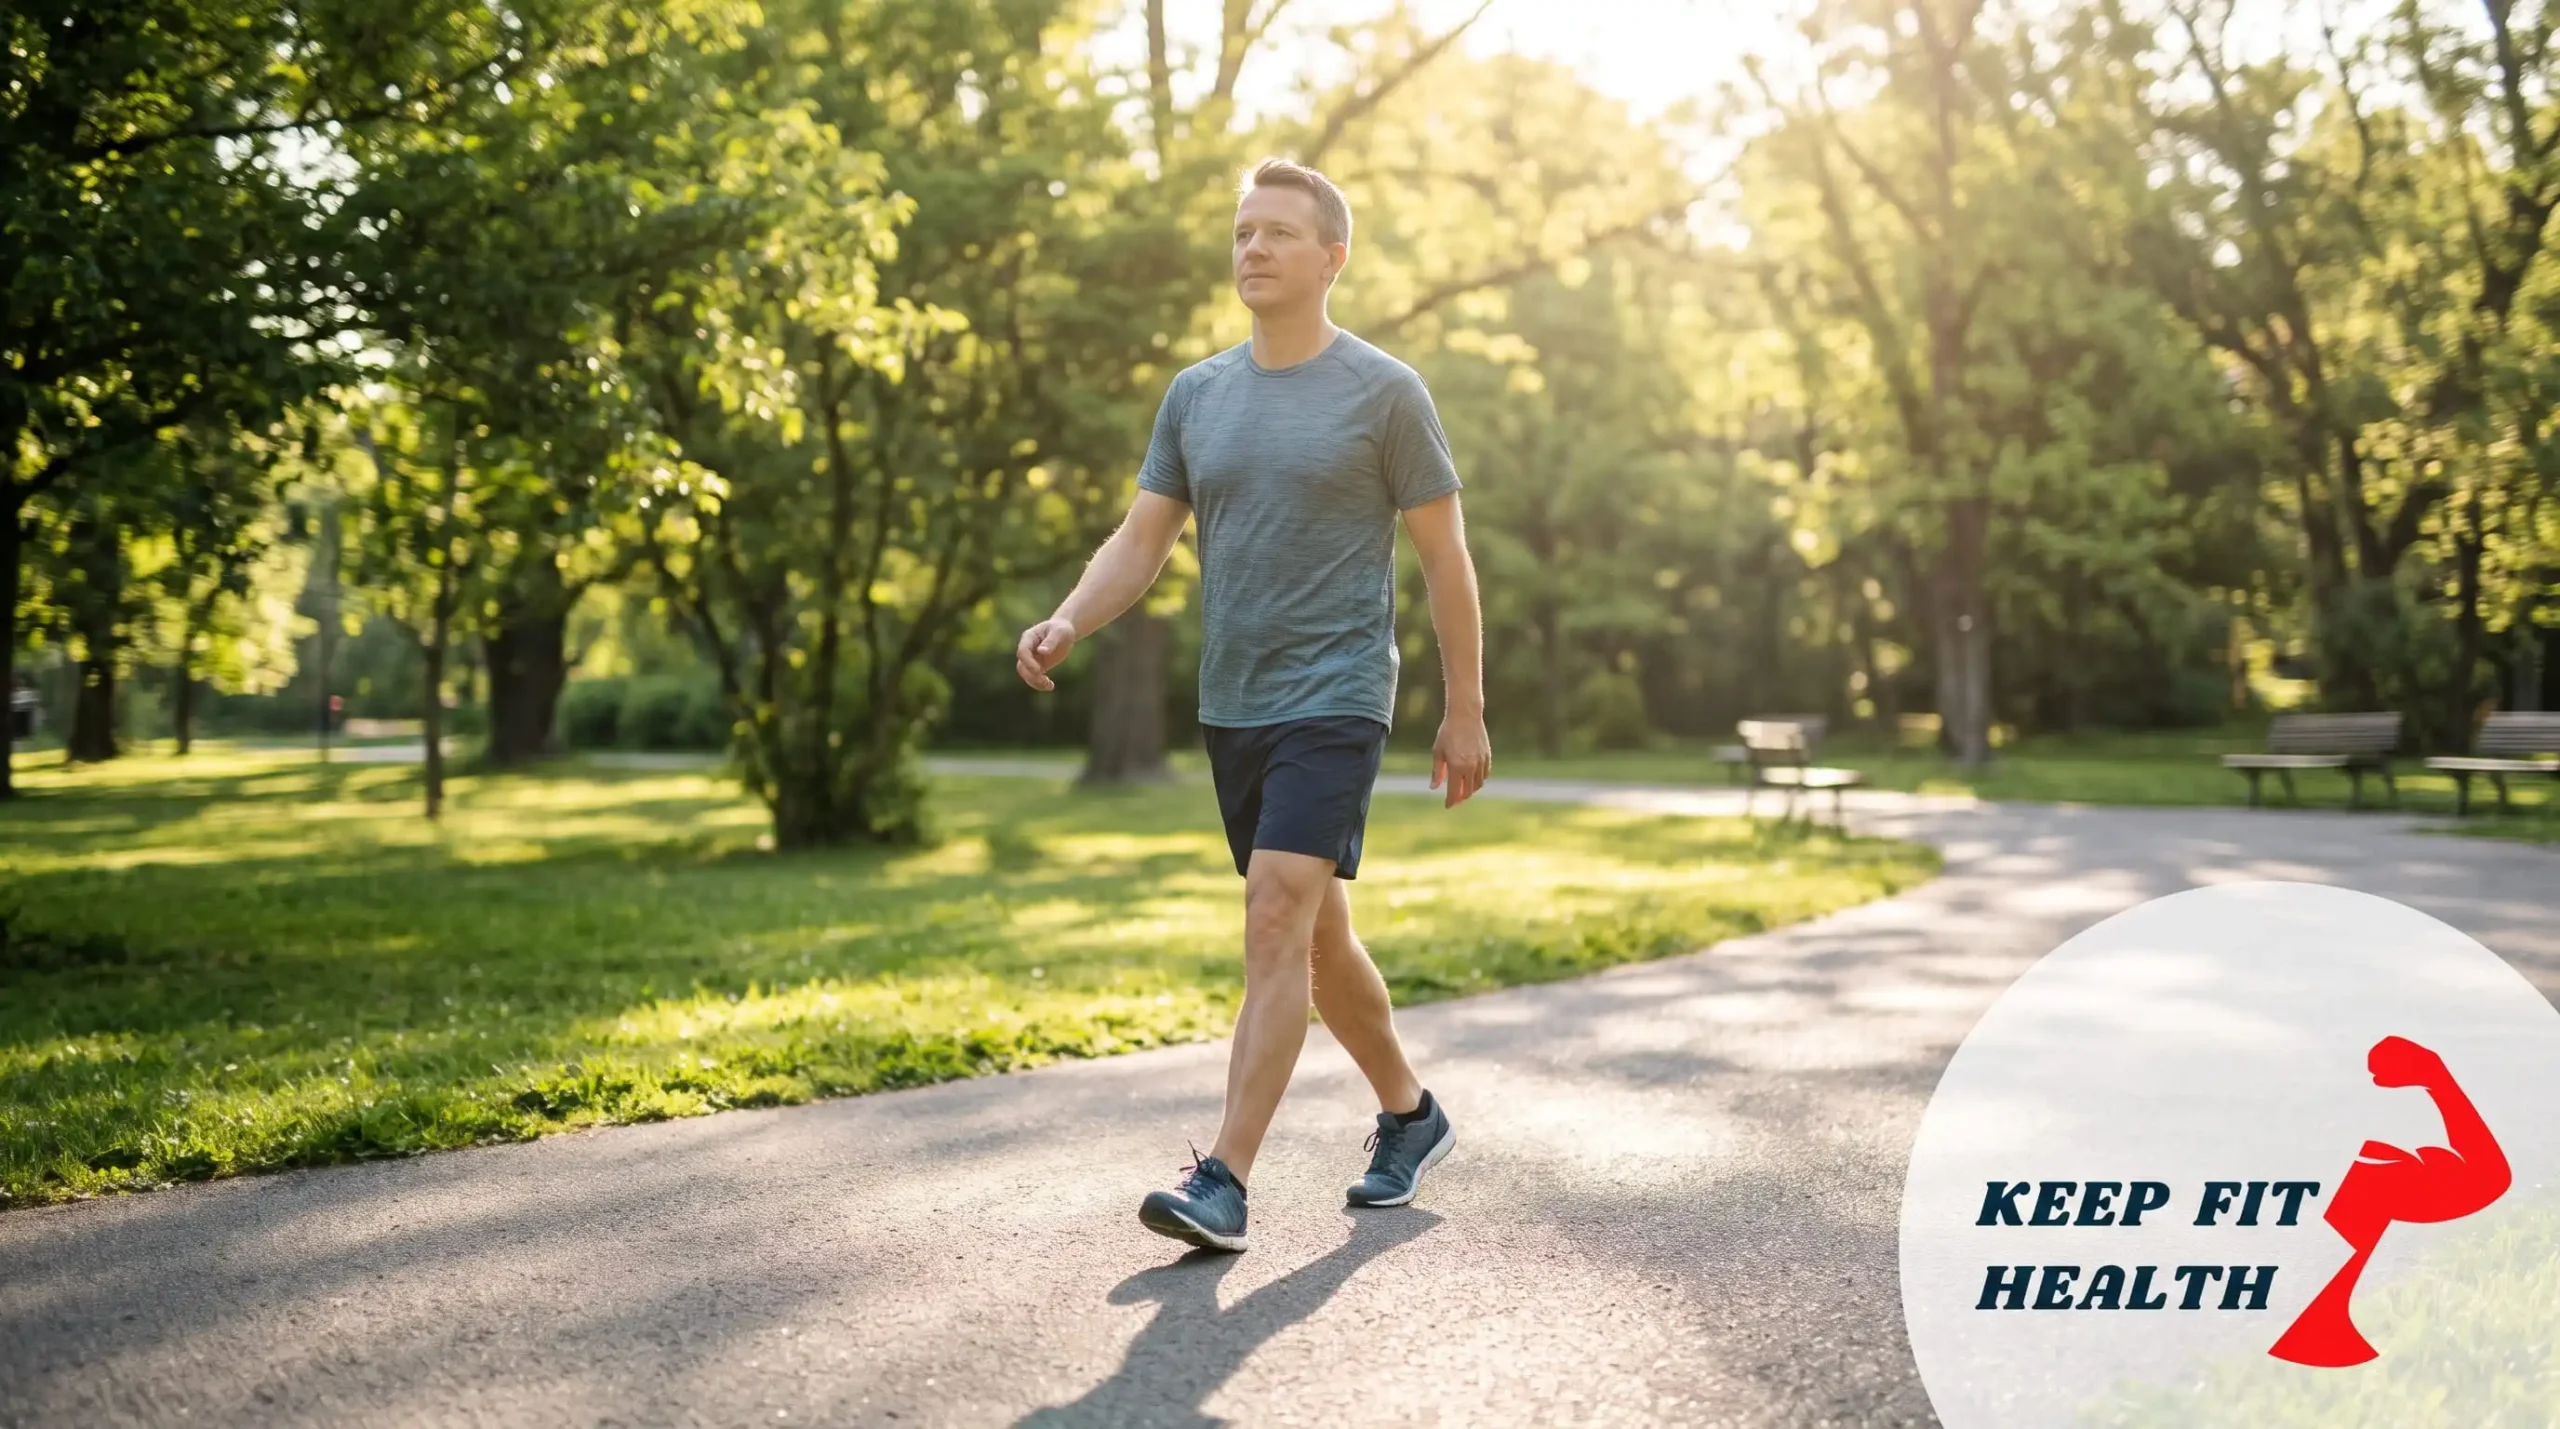
Walking for Lower Back Pain: A Complete Spine Relief Guide

walking for lower back pain

Editorial & Clinical Note: The ergonomic guidelines, gait corrections, and rehabilitation exercises detailed in this article are provided strictly for educational purposes. They do not replace formal clinical assessment, radiological imaging, or personalized treatment from a licensed orthopedic spine specialist or physical therapist. If you experience numbness radiating down both legs, bowel/bladder incontinence, or severe progressive muscle weakness, seek emergency medical care immediately.

Walking for lower back pain is one of the most effective, research-backed non-pharmacological interventions for alleviating chronic lumbar stiffness and disc discomfort. When lumbar joints seize up or postural strain irritates nerve roots, human instinct often urges us to lie down flat in bed. However, prolonged bed rest weakens paraspinal stabilizers, stiffens ligaments, and reduces fluid circulation to spinal discs.

The human spine is engineered for dynamic, low-impact bipedal motion. A brisk, well-aligned walk acts as an active hydraulic pump: it circulates nutrient-dense fluid into the avascular intervertebral discs, stimulates endorphin release, and mobilizes tonic hip flexors that pull on the pelvis. By refining your step mechanics, eliminating anterior pelvic tilt, and adhering to calibrated walking intervals, practicing walking for lower back pain provides a safe, accessible pathway toward restoring long-term functional mobility.

The Biomechanics of the Lumbar Spine During Walking

The lumbar spine does not work in isolation; it functions as the central shock-absorbing column connecting the ribcage to the pelvis and lower extremities. During a normal walking gait, kinetic energy transfers upward from the ground through your ankles, knees, and hips directly into the sacroiliac (SI) joints and lower lumbar vertebrae ($L1$ through $L5$).

1. The Intervertebral Disc “Hydraulic Pump” Effect

Intervertebral discs have very little direct blood supply. They rely on osmotic diffusion to absorb hydration, glucose, and amino acids while flushing metabolic waste products:

  • Dynamic Loading: The alternating compressive and decompressive forces generated during a rhythmic walk create a gentle pumping action.
  • Tissue Hydration: This mechanical cycle encourages fluid exchange across the cartilaginous endplates, keeping disc rings hydrated and resilient against herniation or degenerative wear.

2. Paraspinal Muscle Activation and Spinal Stability

When you walk with an upright torso, the deep intrinsic muscles of the spine—primarily the multifidus and erector spinae—fire in rhythmic alternating patterns to stabilize each vertebral segment against rotational torque. Unlike high-load gym exercises that can compress sensitive facet joints, low-intensity walking builds muscular endurance in these stabilizer muscles without overloading the posterior spinal arch.

3. The Psoas Connection and Pelvic Mechanics

The psoas major muscle originates directly from the transverse processes and bodies of $T12$ through $L5$, crossing the hip joint to attach to the femur.

  • Sitting for hours at a desk shortens the psoas.
  • When you stand and walk with tight hip flexors, the shortened psoas pulls the lumbar vertebrae forward into an exaggerated arch (anterior pelvic tilt).
  • This posture jams the delicate lumbar facet joints together and pinches exiting nerve roots, which is why poorly aligned walking can initially cause an aching back.

Ergonomic cross-section diagram of the lumbar spine, pelvis, and psoas muscle showing compressive forces and pelvic tilt during walking. (Visual mockup)

Is Walking for Lower Back Pain Safe for Your Condition?

Understanding the underlying structural cause of your lumbar discomfort determines how you should structure your walking sessions.

Common Lumbar Conditions and Walking Responses:
├── Lumbar Disc Herniation / Bulge:
│   ├── Typical Response: Feels better with gentle walking in neutral/slight extension
│   └── Biomechanical Goal: Decompresses posterior disc space and clears nerve irritation
├── Spinal Stenosis (Narrowing of Spinal Canal):
│   ├── Typical Response: Extension causes aching; slight forward flexion brings relief
│   └── Biomechanical Strategy: Interval walking, walking on a gentle incline, or using trekking poles
├── Sacroiliac (SI) Joint Dysfunction:
│   ├── Typical Response: Sharp pain on one side of the lower back/buttock during heel strike
│   └── Biomechanical Strategy: Shorten stride to eliminate asymmetric pelvic twisting
└── Postural Muscle Strain / Spasm:
    ├── Typical Response: Feels tight during the first 3 minutes, eases as tissues warm up
    └── Biomechanical Goal: Restores blood flow and breaks the pain-spasm cycle

4 Essential Gait Adjustments for Lower Back Pain Relief

Walking with poor posture can transfer impact forces straight into your lumbar vertebrae. Implementing these four biomechanical cues protects your spine with every stride.

1. Maintain a Neutral Pelvis (Tuck the Tailbone)

Many walkers inadvertently walk in hyper-lordosis (over-arching the lower back and pushing the abdomen forward).

  • The Fix: Imagine your pelvis is a bucket filled to the brim with water. Avoid spilling water out of the front (anterior tilt) or back (posterior tilt).
  • Kinematic Cue: Gently draw your navel toward your spine (approximately 20% contraction) and drop your tailbone slightly toward the floor. This stabilizes the $L4-L5$ and $L5-S1$ junction.

2. Shorten Stride Length and Increase Cadence

Overstriding—reaching your leading foot far ahead of your body—locks the knee and drives a jarring ground reaction force up through the kinetic chain into your lower back.

  • The Fix: Shorten your forward reach by 10% to 15% and increase your step turnover to 105–118 steps per minute.
  • Kinematic Cue: Focus on landing with your foot beneath your center of mass. This allows your ankle and calf muscles to absorb shock rather than transmitting it straight to your lumbar joints. Walkers who also battle lower-leg tension can check our guide on shin splints from walking to refine step efficiency.

3. Coordinate Arm Swing for Thoracic Counter-Rotation

The human gait requires reciprocal rotation: when your right foot steps forward, your left arm swings forward.

  • The Problem: Walking with hands in pockets or holding a smartphone locks the thoracic spine. When the mid-back cannot rotate, that twisting torque is forced into the lumbar spine, which is built for flexion/extension, not rotation.
  • The Fix: Let your arms swing freely from your shoulders, with elbows bent loosely at 90 degrees. This distributes rotational forces safely throughout your ribcage and thoracic spine.

4. Push Off Through the Big Toe and Glutes

Sluggish gluteal muscles force the lumbar erectors to do the heavy lifting of keeping you upright.

  • Kinematic Cue: Focus on actively pushing the ground away behind you with your glutes and the ball of your foot. Strong glute extension propels you forward while taking excessive strain off your lower back.

5 Pre- and Post-Walk Exercises to Decompress the Spine

Before heading out the door, perform these gentle physical therapy movements to lubricate spinal joints and release tight muscular stabilizers.Targeted mobility sequence showing cat-cow spinal decompression and standing hip flexor opening. Format: WebP, optimized under 1MB. (Visual mockup)

1. Standing Hip Flexor Opener

Tight hip flexors tether the lumbar spine into an painful arch.

  1. Stand tall and step your right foot back about two feet into a split stance.
  2. Tuck your pelvis underneath you (posterior tilt) until you feel a gentle pull down the front of your right hip.
  3. Raise your right arm straight overhead and lean gently to the left.
  4. Hold for 30 seconds while breathing deeply; repeat on the opposite side before every walk.

2. Standing Thoracic Windmills

  1. Stand with feet shoulder-width apart and knees soft.
  2. Cross your arms over your chest, placing your hands on opposite shoulders.
  3. Keeping your hips and pelvis locked straight ahead, gently rotate your shoulders and ribcage 30 degrees to the left, pause for 2 seconds, then rotate to the right.
  4. Perform 10 controlled repetitions per side to wake up mid-back rotation.

3. The McGill Bird-Dog (Core Stability)

  1. Start on all fours with your hands stacked directly under your shoulders and knees under your hips.
  2. Maintain a neutral, flat spine (do not let your lower back sag).
  3. Slowly extend your right arm forward and your left leg straight back until both are parallel to the floor.
  4. Hold the position for 6 to 8 seconds without letting your hips tilt or your lower back arch.
  5. Return to the start and alternate sides for 3 sets of 5 repetitions per side.

4. Supine Glute Bridges

  1. Lie on your back with knees bent and feet flat on the floor, hip-width apart.
  2. Drive down through your heels and squeeze your glutes to raise your hips until your thighs and torso form a straight line.
  3. Avoid over-arching your lower back at the top; the lift should come purely from your gluteal muscles.
  4. Hold for 3 seconds, lower under control, and complete 2 sets of 12 repetitions to wake up hip extension prior to walking.

5. Post-Walk Calcaneal Wall Calf Release

Tight calf muscles and Achilles stiffness alter normal ankle flexion, which alters your gait and transmits impact shock up into your spine. Pair your walking recovery with the calf stretches detailed in our walking with plantar fasciitis protocol to keep your entire posterior kinetic chain moving freely.

Structured Weekly Walking Progression for Back Pain

When recovering from lumbar discomfort, frequency matters far more than single-session endurance. Three short 10-minute walks spaced throughout the day cause far less disc compression and muscle fatigue than one continuous 30-minute walk.

Phase & FocusWalking FrequencySession DurationDaily TotalSurface / Terrain Recommendations
Phase 1: Acute Decompression3 sessions per day8 to 10 minutes25 to 30 minsFlat, firm track, level park trail, or zero-incline treadmill
Phase 2: Endurance Building2 sessions per day15 to 20 minutes30 to 40 minsSmooth asphalt, level packed dirt trails; avoid steep hills
Phase 3: Active Conditioning1 to 2 sessions per day25 to 35 minutes45 to 60 minsVaried terrain, gentle rolling paths, brisk fitness walking
  • The Rule of 24 Hours: If your lower back feels noticeably more painful or stiff 24 hours after a walking session, you exceeded your current tissue load capacity. Step back to the previous phase for 3 to 4 days before progressing again.

Footwear and Surface Selection: Protecting the Spine

The shoes you wear act as your body’s initial defense against vertical ground impact.

Footwear Criteria for Lower Back Support:
├── Midsole Shock Absorption: Balanced EVA/Superfoam dampens ground impact shock
├── Heel-to-Toe Drop: 8 mm to 10 mm balances pelvic angle and achilles load
├── Torsional Stability: Rigid shank prevents inward arch collapse and rotational knee torque
└── Secure Heel Counter: Centers calcaneus to prevent asymmetric sacroiliac shearing
  • Avoid Completely Flat, Unsupportive Shoes: Walking in worn-out sneakers, unpadded flats, or flimsy sandals causes excessive heel strike shock to bypass the foot and travel straight into your lower lumbar joints.
  • Control Overpronation: When your foot collapses inward upon weight-bearing, your shin and femur rotate internally, pulling the pelvis into an asymmetric tilt. For walkers managing low or fallen arches, review our comprehensive analysis on the best walking shoes for flat feet to find models that stabilize your foundation and protect your spine.

Nutritional & Systemic Support for Spinal Disc Health

Spinal discs and connective ligaments require specific biochemical building blocks to maintain hydration and manage inflammation.

1. Cellular Hydration and Fluid Balance

Intervertebral discs are composed primarily of water held within a proteoglycan gel matrix. Even mild chronic dehydration reduces disc height and dampens its ability to absorb impact. Drink at least 8 to 10 glasses of water daily, especially before and after walking sessions.

2. Collagen and Connective Tissue Synthesis

The outer ring of each spinal disc (the annulus fibrosus) consists of concentric rings of Type I and Type II collagen. Ensuring optimal daily protein intake, alongside foundational micronutrients like Vitamin C, Zinc, and Vitamin D3, supports natural tissue repair. To ensure your daily baseline is covered with third-party tested ingredients, read our detailed guide on the best women’s multivitamins.

3. Anti-Inflammatory Whole Foods

Systemic low-grade inflammation sensitizes peripheral pain receptors along the spinal ligaments. Prioritize a whole-food Mediterranean diet rich in omega-3 fatty acids (wild salmon, chia seeds, walnuts), leafy greens, and polyphenol-rich berries, while minimizing ultra-processed sugars and industrial seed oils.

Frequently Asked Questions

Why does my lower back hurt more after walking for only 10 minutes?

Post-walk pain is typically caused by overstriding, walking with tight hip flexors (which pulls the spine into hyper-lordosis), or wearing shoes with dead, compacted midsoles. Try shortening your stride, engaging your core slightly to tuck your pelvis, and splitting your walks into two 5-minute sessions instead of one 10-minute outing.

Is walking on a treadmill better than walking outside for back pain?

A treadmill provides a flat, controlled, shock-absorbing belt that can be gentler on sensitive spinal joints than concrete sidewalks. However, outdoor walking on flat dirt trails or rubberized running tracks promotes natural variations in stride that recruit stabilizer muscles more effectively. Start on a treadmill if outdoor surfaces are uneven, then transition outside as tolerance improves.

Should I use trekking poles for walking with back pain?

Yes. Trekking poles or walking sticks are exceptionally helpful for individuals dealing with spinal stenosis, degenerative disc disease, or balance issues. They transfer up to 15% to 20% of ground reaction impact off your lower back and legs into your upper body, while encouraging an upright, supported torso.

Can walking help a herniated disc heal?

Yes. Gentle, upright walking in a neutral spinal posture creates cyclical fluid exchange across intervertebral discs, increasing oxygenation and nutrient delivery. As long as walking does not cause pain to radiate down your leg (sciatica), it is one of the most effective non-surgical recovery tools available.

Final Thoughts & Daily Action Steps

Practicing walking for lower back pain provides a safe, natural way to relieve lumbar stiffness and rebuild core stability. Instead of waiting on the couch for back discomfort to disappear, use gentle, controlled walking as active medicine.

Focus on a tall posture, take shorter and quicker steps, keep your pelvis level, and let your arms swing naturally. Small daily walks will restore your spinal mobility and keep you moving comfortably.

For more evidence-based biomechanics breakdowns, footwear guides, and joint recovery protocols, explore our resources across Keep Fit Health, and connect directly with Dorene Lambert on Facebook for weekly mobility routines and coaching tips.

Shin Splints from Walking: Causes, Relief & Prevention

Shin Splints from Walking

Editorial & Clinical Note: The biomechanical cues, rehabilitation protocols, and recovery timelines in this guide are provided strictly for educational purposes. They do not replace formal clinical assessment, compartment pressure testing, or radiological evaluation from a licensed orthopedic surgeon or sports physical therapist.

Experiencing persistent shin splints from walking can disrupt what should be one of the most accessible low-impact forms of cardiovascular exercise. Whether you have increased your daily step count, added incline treadmill walking to your routine, or started walking on hard asphalt sidewalks, sharp or aching pain radiating down the front or inner borders of your lower legs signals that your muscular and skeletal tissues are absorbing more stress than they can remodel.

The medical term for this condition is Medial Tibial Stress Syndrome (MTSS). It represents a continuum of bone strain and fascial micro-trauma along the tibia. While runners are often considered the primary sufferers of lower-leg stress, power walkers and daily commuters frequently battle the condition when unsupportive footwear, sudden training spikes, or poor gait kinematics overload the anterior and deep posterior leg compartments. By addressing root kinematic faults, performing targeted soft-tissue releases, and using smart cross-training protocols, recovering from shin splints from walking can become a manageable and predictable process.

What Are Shin Splints? (Anterior vs. Posterior MTSS)

What Are Shin Splints

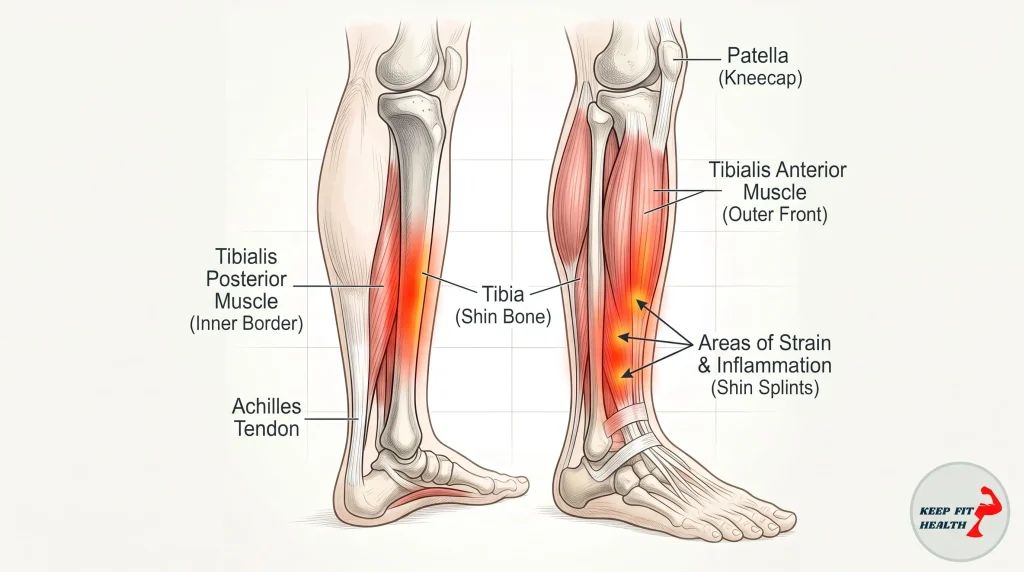
Shin splints are not a single isolated injury; they are an overuse spectrum affecting the muscles, tendons, and periosteum (the fibrous connective tissue sheath covering bone) of the lower leg.

1. Anterior Shin Splints (Front of the Shin)

  • Affected Muscle: Tibialis anterior.
  • Location: The front, lateral edge of the shinbone.
  • Mechanism: The tibialis anterior is responsible for dorsiflexing the foot (lifting your toes) and controlling how rapidly your foot lowers to the ground after heel strike. Walking at brisk tempos or on inclines forces this muscle to perform intense eccentric contractions, resulting in localized inflammation and cramping along the front of the shin.

2. Posterior Shin Splints (Inside of the Shin)

  • Affected Muscles: Tibialis posterior, soleus, and flexor digitorum longus.
  • Location: The lower inner third of the shin along the medial tibial border.
  • Mechanism: The tibialis posterior decelerates pronation and supports the medial longitudinal arch. When your arch collapses inward, excessive tension pulls the deep fascia away from the medial tibia, causing pain that is often confused with plantar fasciitis or Achilles strain.

Anatomical diagram of the tibia, tibialis anterior, and tibialis posterior muscles illustrating mechanical strain and periosteal pull during walking. (Visual mockup)

The Primary Triggers of Shin Splints from Walking

Understanding the root cause of your lower-leg pain prevents you from falling into the cycle of resting until the pain stops, only to trigger a flare-up during your very next walk.

1. The “Too Much, Too Soon” Training Error

Bone tissue and fascial networks remodel far more slowly than cardiorespiratory fitness improves. If your cardiovascular endurance allows you to jump from 4,000 to 12,000 steps per day, your heart and lungs will adapt within days. However, your cortical bone and connective fascial attachments require weeks of progressive mechanical loading to thicken and adapt. Sudden increases in volume, pace, or incline create micro-damage faster than osteoblasts can synthesize new bone matrix.

2. Overstriding and Excessive Braking Forces

When walking quickly, many people try to cover more distance by throwing their front foot far ahead of their pelvis.

  • This forward reach causes the foot to land at a steep angle on the heel.
  • The ground reaction force drives upward through the heel and straight into the shinbone, acting like a brake on your forward momentum.
  • The anterior compartment muscles must fire with high force to keep your forefoot from slapping violently down against the pavement, generating severe eccentric strain.

3. Foot Biomechanics and Overpronation

An unstable foot structure is one of the most common precursors to persistent shin pain. If you have flat arches or hypermobile subtalar joints, your foot collapses inward upon weight acceptance. This inward twisting puts high rotational stress on the lower leg, pulling the tibialis posterior and soleus muscles against the tibial periosteum. Walkers facing these alignment issues benefit from learning how to choose stability footwear in our best walking shoes for flat feet guide.

4. Walking Exclusively on Hard Surfaces

Concrete has almost zero shock compliance. Walking exclusively on concrete sidewalks or asphalt roads reflects high peak impact loads into your lower extremities. Without proper midsole cushioning to dampen these forces, the tibia and its surrounding soft tissues absorb the brunt of the kinetic impact.

Shin Splints vs. Stress Fractures vs. Exertional Compartment Syndrome

Not all lower-leg pain is simple Medial Tibial Stress Syndrome. Differentiating between basic shin splints, a tibial stress fracture, and chronic exertional compartment syndrome (CECS) is critical to avoid permanent tissue damage.

CharacteristicMedial Tibial Stress Syndrome (Shin Splints)Tibial Stress FractureChronic Exertional Compartment Syndrome (CECS)
Pain DistributionDiffuse discomfort across 5 to 10 cm along the shin borderHighly localized pinpoint pain (< 2 to 3 cm) directly on boneFull, bursting tightness across the muscular compartment
Pain BehaviorAches early in the walk, may loosen slightly, returns post-walkSharp, throbbing pain that steadily intensifies with every stepTightness increases until foot feels numb or weak; clears with rest
Morning PainMild morning stiffness that clears with brief movementAches constantly, even while resting or bearing light weight in bedTypically absent at rest or during non-exercise hours
Single-Leg Hop TestMild discomfort, but generally tolerableSevere, sharp, sharp bone pain upon impactDiscomfort driven by fullness/tightness, not sharp bone pain
Red Flag SymptomsNoneFocal swelling, warmth, or palpable bone tendernessFoot drop, numbness, tingling between toes

Warning: If pressing one finger onto your shin causes pinpoint, sharp, wincing pain, or if you cannot perform a single hop on that leg without severe pain, stop walking immediately and consult an orthopedic specialist for diagnostic imaging (such as an MRI or bone scan) to rule out a cortical stress fracture.

Active Rehabilitation Protocol for Shin Pain Relief

Passive rest may calm acute inflammation, but returning to activity without strengthening the kinetic chain will only cause symptoms to return. Use this structured physical therapy protocol to rebuild your lower-leg resilience.

Rehabilitation Sequence:
1. Soft-Tissue Decompression (Calf & Anterior Tibia)
2. Joint Mobility (Ankle Dorsiflexion)
3. Isometric & Eccentric Strengthening (Tibialis Anterior / Posterior)
4. Functional Kinetic Integration (Hips & Core)

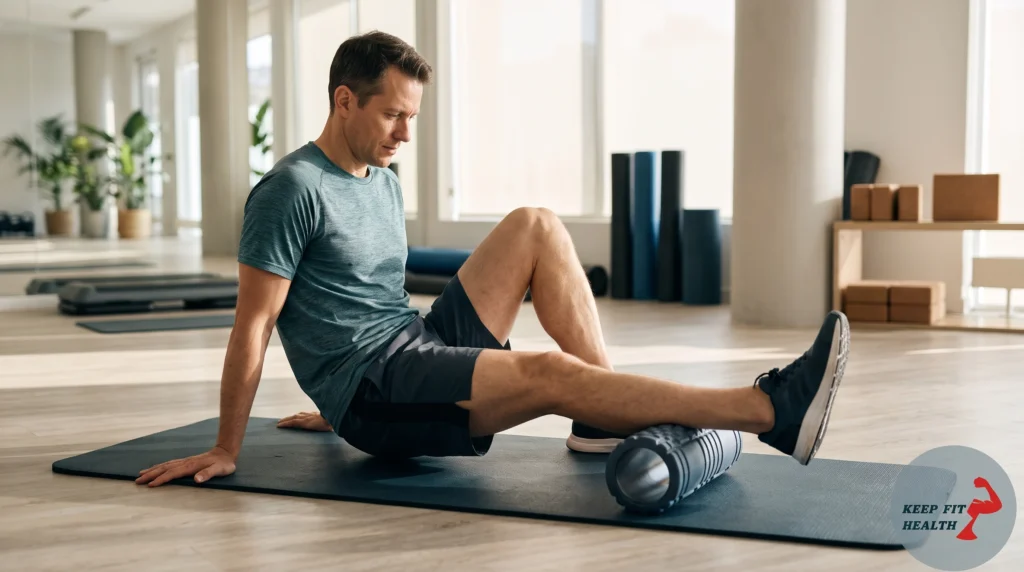
1. Foam Rolling and Targeted Soft-Tissue Release

Never roll a dense foam roller directly over the edge of the shinbone itself. Instead:

  • Anterior Compartment: Kneel on a foam roller placed slightly outward on the fleshy muscle belly to the lateral side of the shinbone. Roll slowly up and down the upper two-thirds of the muscle belly for 60 seconds to reduce tonic muscle guarding.
  • Calf Complex: Sit with your calf resting over a dense lacrosse ball or trigger-point roller. Cross your opposite leg over top to apply gentle downward pressure, rolling the thickest belly of the gastrocnemius and deep soleus to relieve passive tension on the ankle joint.

2. Standing and Seated Heel Walks (Tibialis Conditioning)

  • How to perform: Stand tall with your shoes off on a flat, carpeted surface or yoga mat.
  • Lift your forefoot and toes entirely off the ground so that you are balancing purely on your heels.
  • Walk slowly forward for 20 to 30 steps while keeping your toes lifted as high as possible toward your shins.
  • Rest for 30 seconds and repeat for 3 sets.
  • This exercise conditions the tibialis anterior, building endurance to prevent foot-slap during brisk fitness walks.

3. Seated Resistance Band Inversion and Eversion

  • Inversion (Tibialis Posterior): Anchor a light-to-medium loop resistance band to an external post. Loop the opposite end around the inside of your foot while seated. Turn your foot inward toward your midline against the band’s resistance, pause for a 2-second isometric hold, and return over 3 controlled seconds. Complete 3 sets of 15 reps.
  • Eversion (Peroneal Complex): Reverse the band setup and turn your foot outward against the resistance to ensure balanced strength across the lateral stabilizers of the ankle.

4. Soleus Wall Sits

  • The deep soleus muscle absorbs substantial ground reaction forces during walking.
  • Lean your back flat against a wall with your knees bent at a 90-degree angle.
  • While holding the wall sit position, press onto the balls of your feet to raise your heels 2 to 3 inches, hold for 3 seconds, and slowly lower.
  • Perform 3 sets of 12 to 15 reps to build endurance in the deep calf tissues that shield the posterior tibia from excessive stress.
Active Rehabilitation Protocol

4 Biomechanical Fixes for Your Walking Form

Correcting your walking mechanics reduces ground shock and helps protect your shins on everyday routes.

1. Increase Step Cadence and Eliminate Overstriding

The most effective mechanical adjustment for shin splints from walking is to shorten your stride and step more frequently.

  • Instead of reaching your heel forward, focus on rolling smoothly over your stance foot.
  • Aim for a cadence of 105 to 118 steps per minute.
  • Stepping at a slightly higher turnover rate ensures your foot lands directly under your center of mass, transforming a jarring braking force into smooth forward momentum.

2. Land with a Softer, Midfoot-Biased Heel Transition

Avoid slamming the posterior edge of your heel into the ground with your toes pulled up to their maximum height. Let your heel kiss the ground gently and transition weight immediately along your midfoot to the base of your toes.

3. Engage Gluteal and Core Stabilizers

Weak hip abductors (gluteus medius) allow the knee to cave inward (valgus collapse) during midstance. This dynamic misalignment forces the lower leg to overpronate to keep the foot flat on the ground.

  • Consciously activate your glute muscles as you extend your leg behind you.
  • Keep your pelvis level and your core gently engaged, which prevents lateral hip drop and relieves twisting forces along the tibia.

4. Vary Your Walking Surface

Avoid logging all of your miles on concrete pavement. Whenever possible, shift portions of your route to:

  • Packed dirt nature trails
  • Cinder or rubberized community running tracks
  • Level park grass
  • Shock-absorbing treadmills

The Shoe and Orthotic Matrix: What to Look For

Your footwear acts as the primary interface between ground impact forces and your skeletal system.

Ideal Footwear Criteria for Shin Pain:
├── Midsole Cushioning: Resilient EVA or Nitrogen-infused TPU to absorb shock
├── Torsional Stability: Rigid midfoot shank to prevent medial arch twisting
├── Moderate Drop: 8 mm to 10 mm heel-to-toe drop to balance load across tissues
└── Secure Heel Counter: Stiff internal cup to prevent rearfoot wobble
  • Avoid Overly Flexible “Minimalist” Shoes: A shoe that you can roll into a tight ball lacks the torsional rigidity needed to stabilize an unstable arch. If the shoe twists easily under light pressure, your tibialis posterior and anterior muscles will have to work overtime to keep your foot stable.
  • Replace Worn-Out Midsoles Promptly: Walking shoes should generally be retired every 350 to 500 miles. Even if the rubber outsole tread looks relatively intact, internal foam midsoles lose their elastic rebound over time, transmitting shock straight into your lower legs.
  • Consider Over-the-Counter Supportive Insoles: If you have low or collapsing arches, an over-the-counter firm orthotic insert can provide immediate structural arch support, reducing the eccentric strain placed on the medial tibia.

Systemic Recovery, Nutrition, and Bone Density

Healing bone and fascial attachments requires internal metabolic support alongside physical rehab.

1. Optimize Bone Matrix Micronutrients

Cortical bone remodeling relies on adequate daily calcium, vitamin D3, and vitamin K2 intake. If dietary restrictions make meeting these baseline needs difficult, selecting a comprehensive, third-party verified formula can help prevent nutritional gaps. Review our detailed guide on the best women’s multivitamins to learn how to choose bioavailable, independent-tested nutrient formulations.

2. Collagen and Connective Tissue Support

The periosteum and fascial sheaths are built from dense Type I collagen fibers. Ensuring adequate daily protein intake (1.2 to 1.6 grams per kilogram of body weight for active adults), paired with vitamin C-rich foods, supports collagen synthesis during the active recovery phase.

3. Active Cross-Training Options

You do not need to abandon cardiovascular fitness while waiting for shin pain to resolve. Maintain aerobic fitness using zero-impact cross-training modalities:

  • Indoor Cycling: Spin at moderate cadence (80 to 90 RPM) with low-to-moderate resistance. Ensure the balls of your feet are centered on the pedals without pointing your toes downward.
  • Lap Swimming or Water Aerobics: Water provides buoyancy that eliminates ground impact forces while promoting circulation to the lower extremities.
  • Rowing Ergometers: Provides low-impact conditioning while strengthening the posterior chain and upper back.

Frequently Asked Questions

Can I keep walking if I have shin splints?

Yes, but only within a pain-free or very low discomfort threshold (0 to 3 on a 10-point scale). If your shin pain causes you to limp, alters your stride mechanics, or hurts intensely the following morning, you are overloading the tissue and must reduce your volume. Shorten your distance, decrease your pace, switch to softer surfaces, and focus on rehabilitation exercises.

How long does it take for shin splints to heal?

Mild cases of Medial Tibial Stress Syndrome typically resolve within 3 to 6 weeks of modified activity, proper footwear, and consistent strengthening. Severe cases involving deep periosteal inflammation can take 8 to 12 weeks. Trying to return to your previous walking volume before completing rehabilitation often resets the healing timeline.

Does compression wear help relieve shin splints?

Graduated compression socks or calf sleeves do not cure the underlying biomechanical cause of shin splints, but they can help manage symptoms. They support venous blood return, reduce muscle oscillation during foot strike, and keep the lower-leg tissues warm during walks.

Should I apply ice or heat to shin splints?

  • Ice (Cryotherapy): Best applied immediately after a walk for 15 to 20 minutes to numb sharp discomfort and calm acute periosteal inflammation.
  • Heat: Best applied before walking or stretching to relax stiff calf musculature, increase tissue compliance, and improve local blood flow.

Final Thoughts & Long-Term Prevention

Overcoming shin splints from walking does not mean giving up your daily walks or active lifestyle. By shortening your stride, trading hard concrete for softer surfaces, strengthening your tibialis anterior and calf muscles, and wearing stable footwear, you address the root causes of the pain rather than simply masking the symptoms.

Take a proactive, structured approach to your lower-leg health. Give your body the time and support it needs to adapt, and you will build a stronger, more resilient walking stride for miles to come.

For more hands-on guidance on lower-extremity biomechanics and choosing supportive walking gear, check out our guide to the best walking shoes for flat feet, and connect with Dorene Lambert on Facebook for weekly mobility routines and practical coaching advice.

Walking with Plantar Fasciitis: A Complete Relief Guide

walking with plantar fasciitis

Editorial Note: The movement strategies, gait adjustments, and physical therapy principles outlined in this guide are for informational purposes. They do not replace formal clinical assessment, imaging, or physical therapy treatment plans from a licensed podiatrist or orthopedic doctor.

Walking with plantar fasciitis can feel like stepping directly onto a sharp nail the moment your heel contacts the floor in the morning. When the thick band of fibrous tissue that spans the underside of your foot becomes strained and irritated, every step pulls relentlessly at its calcaneal attachment.

However, complete bed rest is rarely the solution for tissue healing. While acute inflammation demands brief rest, active recovery through controlled, low-impact loading helps stimulate blood flow and re-align damaged collagen fibers. By understanding proper biomechanics, pacing your mileage, and using proven stretching protocols, walking with plantar fasciitis can transition from a painful setback into a structured pathway back to pain-free movement.

What Happens to the Plantar Fascia During a Walking Stride?

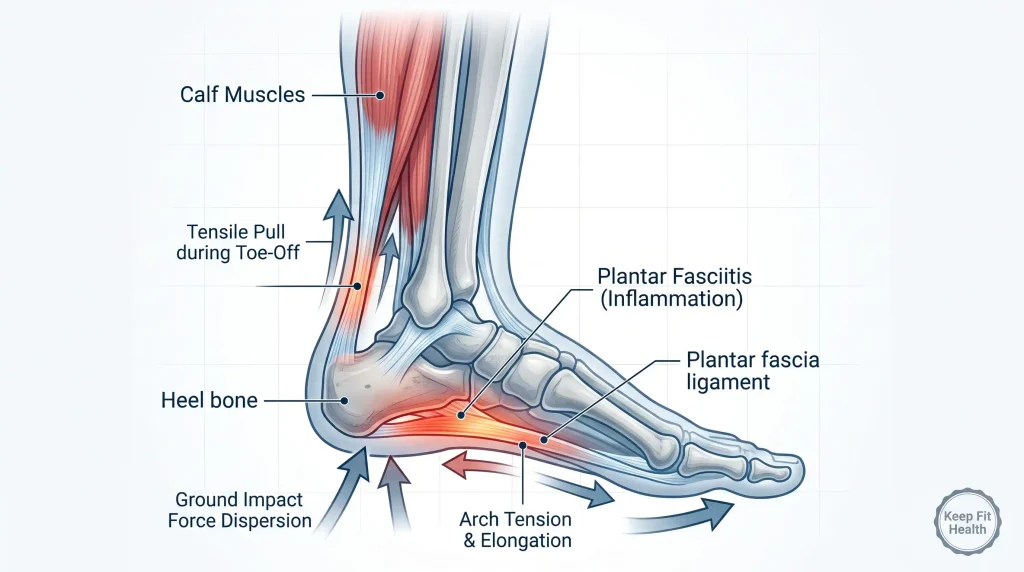
The plantar fascia is a dense, multilayered aponeurosis originating at the medial tubercle of the calcaneus (heel bone) and fanning out to attach to the proximal phalanges of each toe. It operates as a shock absorber and mechanical spring via the Windlass Mechanism.

what happens to the plantar fascia during a walking stride

The Windlass Mechanism Explained

During terminal stance and toe-off, your big toe naturally dorsiflexes (bends upward). This movement winds the plantar fascia tightly around the metatarsal heads, shortening the distance between your heel and forefoot:

  • The Arch Elevates: The foot transforms from a flexible, shock-absorbing platform into a rigid lever capable of propelling you forward.
  • Tension Peaks: If the tissue is chronically tight, micro-teared, or inflamed, this winding action generates intense tensile stress right at the heel bone.
  • Secondary Kinetic Stress: If the foot arch collapses or overpronates—a frequent challenge for those seeking the best walking shoes for flat feet—the plantar fascia undergoes additional torsional twisting, delaying recovery.

Is Walking with Plantar Fasciitis Safe? (The Stop-Light Rule)

A common dilemma is whether to push through the discomfort or stop walking entirely. Complete immobilization leads to calf muscle atrophy, loss of ankle dorsiflexion, and stiffening of the plantar aponeurosis.

Use the Traffic Light Discomfort Scale to determine whether your walk is therapeutic or harmful:

1. Green Light (Safe to Continue)

  • Discomfort Rating: 0 to 3 out of 10.
  • Characteristics: Mild stiffness during the first 2 minutes of walking that eases as the foot warms up.
  • Next-Day Check: Pain does not worsen the following morning.

2. Yellow Light (Proceed with Caution / Modify)

  • Discomfort Rating: 4 to 5 out of 10.
  • Characteristics: Dull ache present throughout the walk, but your gait mechanics remain symmetrical (you are not limping).
  • Next-Day Check: Mild morning soreness that dissipates within 15 minutes of moving around. Shorten your distance by 25% for the next walk.

3. Red Light (Stop Immediately)

  • Discomfort Rating: 6 out of 10 or higher.
  • Characteristics: Sharp, stabbing, or radiating pain that causes you to alter your stride or limp on the outside of your foot.
  • Next-Day Check: Severe throbbing or sharp morning pain that persists for hours. Cease fitness walks immediately and switch to non-weight-bearing cross-training (such as swimming or stationary cycling).

4 Biomechanical Gait Adjustments for Pain Relief

Adjusting your gait mechanics can decrease the repetitive percussive force on your rearfoot.

1. Shorten Your Stride and Increase Cadence

Overstriding occurs when you throw your leading foot far out in front of your pelvis. This creates a severe heel-strike braking force that channels shock directly into the plantar fascia origin.

  • Correction: Shorten your stride length by roughly 10% to 15%. Aim for a cadence of 100 to 115 steps per minute.
  • Result: Your foot lands closer beneath your center of mass, distributing landing impact evenly across the entire plantar surface rather than concentrating it solely on the heel.

2. Avoid Exaggerated Push-Off

Pushing off explosively from the balls of your feet engages the Windlass Mechanism under maximum mechanical load.

  • Correction: Think of your feet as rolling wheels rather than springboards. Roll smoothly from midfoot to toe without forcing an aggressive drive off the big toe.

3. Maintain an Upright, Neutral Pelvis

Leaning backward or slumping into anterior pelvic tilt alters lower-extremity tracking and increases calf recruitment. Keep your core gently engaged, ribcage stacked over your pelvis, and gaze focused 15 to 20 feet ahead.

4. Choose Compliant Walking Surfaces

Avoid walking on concrete sidewalks, tiled floors, or hard-packed asphalt during the recovery phase.

  • Opt For: Natural dirt trails, rubberized running tracks, or firm grass surfaces. These substrates provide greater shock compliance and reduce peak ground reaction forces on the heel pad.

5 Essential Stretches and Exercises to Restore Foot Health

A targeted daily physical therapy protocol helps remodel damaged fascia fibers, relieve tight calves, and strengthen intrinsic foot stabilizers.

1. Pre-Bed and Morning Big Toe Extension

Sit in a chair and cross your affected foot over the opposite knee.

  1. Grasp the base of your toes (especially the great toe) with your hand.
  2. Gently pull the toes back toward your shin until you feel a firm stretch along the arch of your foot.
  3. Use your opposite thumb to massage along the taut band in the arch from heel to toe.
  4. Hold for 30 seconds; repeat 3 times before taking your first steps in the morning.

2. Wall Gastrocnemius and Soleus Stretches

Tight calf muscles directly increase tensile strain on the Achilles tendon and plantar fascia.

  • Gastrocnemius (Upper Calf): Stand facing a wall. Step your injured leg straight back with the heel flat on the floor and the knee extended straight. Lean forward into the wall until you feel a stretch in the upper calf. Hold for 30 seconds.
  • Soleus (Lower Calf): Step into the same wall stretch, but bend both knees slightly while keeping the back heel firmly on the floor. This shifts tension downward to the deep soleus muscle. Hold for 30 seconds.

3. Frozen Water Bottle Arch Rolling

Combine gentle myofascial release with localized cryotherapy.

  1. Fill a standard plastic water bottle with water and freeze it solid.
  2. While seated in a chair, place the bottle under the arch of your bare foot.
  3. Roll your foot back and forth from the base of the toes to the front of the heel bone using light, controlled downward pressure.
  4. Continue for 5 to 7 minutes post-walk to reduce acute inflammatory heat.

4. Towel Curls for Intrinsic Muscle Strength

  1. Sit in a chair with bare feet flat on a smooth floor and place a hand towel beneath your feet.
  2. Using only your toes, scrunch and gather the towel toward your heel.
  3. Straighten the towel out and repeat for 3 complete sets.
  4. This exercise strengthens the flexor hallucis brevis and abductor hallucis muscles, helping your foot support its own arch without overstressing the fascia.

The Shoe Selection Matrix: Features That Protect the Arch

The footwear you wear around the house and on walking paths directly determines how much load reaches the calcaneus.

Critical Footwear Criteria

  1. Adequate Heel Elevation: Flat slippers, flip-flops, and low-drop shoes pull the posterior kinetic chain taut. Look for shoes with an 8 mm to 12 mm heel-to-toe drop to relax the calf-fascia interface.
  2. Rigid Midsole Shank: Grab your shoe and attempt to fold it in half. The shoe should bend easily at the ball of the foot (where your toes flex) but remain rigid through the arch. Shoes that bend in the middle provide inadequate support for damaged ligaments.
  3. Firm Heel Counter: Squeeze the back rim of the shoe. A sturdy heel cup cradles the calcaneal fat pad, keeping your natural cushioning directly under the bone.
  4. Cushioned Rocker Soles: Shoes with rockered geometries help roll your foot through terminal stance, reducing the dorsiflexion needed to complete a stride.

Never Walk Barefoot on Hard Floors

When managing active plantar fasciitis, avoid walking barefoot on hardwood, tile, or laminate flooring—even for quick trips to the kitchen. Wear structured recovery slides or supportive indoor shoes at all times to avoid acute heel strikes on unpadded surfaces.

Lifestyle Factors That Influence Tendon and Ligament Healing

Healing connective tissue requires systemic metabolic support alongside localized mechanical care.

1. Body Composition and Weight Management

Every additional pound of body mass multiplies mechanical ground impact forces during walking. Adopting a nutrient-dense, anti-inflammatory whole-food diet relieves ongoing compressive stress on the plantar fat pad and arch.

2. Systemic Micronutrient Sufficiency

Collagen synthesis and tissue repair depend on adequate levels of vitamin C, zinc, magnesium, and vitamin D. For women aiming to balance overall micronutrient intake to aid musculoskeletal recovery, reviewing our guide on best women’s multivitamins provides actionable criteria for finding clean, third-party certified formulas.

3. Night Splint Therapy

During sleep, your feet naturally relax into plantarflexion (pointing downward). In this shortened state, the plantar fascia begins repairing micro-tears overnight. When you take your first morning step, the tissue is abruptly stretched open, re-tearing the newly formed collagen. A soft night splint keeps the ankle held at a neutral 90-degree angle, allowing the tissue to heal in an elongated position and reducing morning pain.

Frequently Asked Questions

Can walking worsen plantar fasciitis?

Yes, if done without proper footwear, on hard surfaces, or through sharp pain. However, controlled walking at a slow pace on soft terrain, coupled with supportive shoes and a shortened stride, increases blood flow and prevents connective tissue contracture. Follow the Traffic Light scale to keep loading safe.

How long does it take for plantar fasciitis to resolve?

Most mild to moderate cases resolve within 6 to 18 weeks with consistent conservative management (stretching, footwear changes, and activity modification). Chronic cases with degenerative changes (plantar fasciosis) may take 6 to 12 months of structured physical therapy.

Should I apply ice or heat to my heel?

  • Ice: Ideal after a walk or at the end of the day to numb sharp discomfort and calm localized inflammation.
  • Heat: Most effective in the morning or prior to walking to warm up stiff muscle fibers and increase tissue elasticity.

When should I consult an orthopedic specialist?

Schedule a medical evaluation if you experience numbness or tingling in your toes (which may indicate tarsal tunnel syndrome), visible bruising, inability to bear weight on the heel, or if pain does not improve after 4 to 6 weeks of dedicated home rehabilitation.

Next Steps for Active Recovery

Recovering from heel pain does not require giving up your daily walks entirely. By adjusting your stride, avoiding barefoot walking on hard surfaces, and performing targeted morning calf and arch stretches, you can remain active while giving your body the conditions it needs to repair.

For additional condition-specific guidance, review our in-depth biomechanics analysis on walking shoes for flat feet, and follow Dorene Lambert on Facebook for weekly mobility routines and practical fitness coaching.

The Science Behind Dumbbell Exercises: Why They Work

Dumbbell exercises are a timeless staple in strength training. Whether you’re new to fitness or a seasoned athlete, dumbbells offer versatile and effective workouts. But why do dumbbell exercises work so well? The answer lies in the science behind resistance training, biomechanics, and muscle activation. Understanding how dumbbells engage muscles, enhance coordination, and promote functional strength reveals why they’re an essential tool in any fitness regimen.

This article dives deep into the scientific principles that make dumbbell workouts effective. It will also show how they improve strength, stability, and overall health.

buy dumbbell

How Dumbbell Exercises Activate Muscles Effectively

Dumbbell exercises utilize the principle of resistance training, which triggers muscle growth and strength development. When lifting dumbbells, your muscles must overcome gravity and resist the weight. This action causes tiny tears in the muscle fibers, which then repair and grow back stronger through a process called muscle hypertrophy.

Unlike machines that guide your movement, dumbbells demand balance and control. This engages stabilizing muscles often neglected by other forms of training. For example, a dumbbell shoulder press not only targets the deltoids but also activates the trapezius and core muscles for support and balance.

Using dumbbells also enables a greater range of motion compared to barbells or machines. This extended motion increases muscle fiber recruitment, especially in compound exercises like dumbbell chest presses or squats.

Research published in the Journal of Strength and Conditioning Research found that free weights, including dumbbells, activate more muscle groups and improve neuromuscular coordination better than machines. Neuromuscular coordination is your brain’s ability to recruit the right muscles at the right time. Dumbbell workouts train your body to move efficiently, which enhances both athletic performance and daily functional movements.

In summary, dumbbells work because they trigger muscle adaptation, improve coordination, and increase joint mobility. These scientific factors collectively explain their effectiveness in building strength and fitness.

The Biomechanics of Dumbbell Training

Dumbbell exercises work by exploiting the natural biomechanics of the human body. Biomechanics is the study of how muscles, bones, tendons, and ligaments work together to produce movement. When using dumbbells, the body must stabilize itself, which mimics real-life movement patterns.

For instance, performing a dumbbell lunge challenges balance, coordination, and unilateral strength. This means each side of the body must work independently, preventing muscle imbalances and promoting symmetry.

Dumbbells also allow for multiplanar movements—exercises that move through more than one plane of motion. Our bodies move in three planes:

  • Sagittal (forward and backward)
  • Frontal (side to side)
  • Transverse (rotational)

Dumbbell exercises can train all three. A dumbbell wood chop works the transverse plane, while a dumbbell side lunge trains the frontal plane. This variety improves joint stability and movement efficiency.

Moreover, dumbbells reduce joint stress compared to barbells. Because each hand moves independently, your joints follow a more natural path, which decreases the risk of injury. This is particularly beneficial for older adults or those with joint limitations.

Studies show that exercises using dumbbells can improve proprioception—your sense of body awareness. Enhanced proprioception leads to better posture, balance, and reaction times. This is crucial not only in sports but also in preventing falls and injuries in daily life.

Thus, the biomechanics of dumbbell training align closely with functional human movement, making these exercises highly beneficial for all ages and fitness levels.

Scientific Principles That Explain Why Dumbbell Exercises Work

1. Progressive Overload

Progressive overload is the cornerstone of muscle and strength development. It means gradually increasing the weight, repetitions, or intensity of your workouts. Dumbbells make it easy to apply progressive overload by allowing small weight increments. This ensures continuous improvement and muscle adaptation.

For instance, you might start with 10 lb dumbbells for a chest press. As you gain strength, moving up to 12.5 lbs continues the muscle-building process without overstraining the body.

2. Motor Unit Recruitment

A motor unit consists of a motor neuron and the muscle fibers it activates. The more weight you lift, the more motor units you recruit. Dumbbell exercises, especially compound moves like the dumbbell deadlift or bench press, activate large motor units that engage multiple muscle fibers. This increases overall strength and muscle density.

3. Stabilizer Muscle Engagement

Dumbbells require balance, which activates stabilizer muscles. For example, during a dumbbell bench press, the core, shoulders, and upper back stabilize the body. This leads to stronger secondary muscles, enhancing total body strength and functional fitness.

4. Eccentric and Concentric Movements

Dumbbell exercises involve both concentric (muscle shortening) and eccentric (muscle lengthening) phases. Studies suggest eccentric movements lead to greater muscle hypertrophy. Lowering the dumbbell slowly during a curl maximizes this effect, stimulating more muscle growth.

5. Hormonal Response

Resistance training with dumbbells increases the release of anabolic hormones like testosterone and growth hormone. These hormones are vital for muscle repair, growth, and fat metabolism. Short, intense dumbbell workouts trigger this hormonal response effectively.

6. Muscle Symmetry and Imbalance Correction

Dumbbells train each side of the body independently, preventing the dominant side from compensating. This promotes muscular symmetry and reduces the risk of injury caused by imbalance.

7. Functional Movement and Mobility

Functional fitness trains your body to perform everyday activities with ease. Dumbbells mimic natural movement patterns, improving mobility and flexibility. For instance, dumbbell squats enhance hip, knee, and ankle mobility.

8. Metabolic Boost

Dumbbell workouts can be structured for cardiovascular and metabolic benefits. High-rep dumbbell circuits raise your heart rate, increasing calorie burn and improving aerobic capacity. Research shows that strength training with dumbbells can boost resting metabolism, aiding in fat loss.

9. Neural Adaptation

When starting a new dumbbell routine, initial strength gains are often due to improved neural efficiency. Your nervous system becomes better at signaling your muscles to contract, increasing strength even before muscle size changes.

10. Joint Health and Injury Prevention

Dumbbells provide freedom of movement that aligns better with joint mechanics. This reduces stress on the joints, making dumbbells a safer option for many. Studies highlight their effectiveness in rehabilitation and joint-friendly training programs.

Dumbbells vs. Other Strength Training Tools

Dumbbells offer several advantages over barbells, machines, and resistance bands. Here’s how they compare:

  • Dumbbells vs. Barbells: Barbells allow for heavier lifts, but they can strain joints and encourage poor form. Dumbbells force each side to work equally, reducing injury risk and improving balance.
  • Dumbbells vs. Machines: Machines isolate specific muscles and guide movement, which limits muscle engagement. Dumbbells activate more stabilizers and support functional training.
  • Dumbbells vs. Resistance Bands: Bands offer variable resistance and portability. However, dumbbells provide consistent load and are better for building strength and muscle mass.

In short, dumbbells combine the benefits of free weights with greater control and safety, making them ideal for most fitness goals.

FAQs

Q: Are dumbbell exercises effective for building muscle?
A: Yes, they trigger hypertrophy, engage stabilizers, and allow progressive overload—all essential for muscle growth.

Q: Can beginners use dumbbells safely?
A: Absolutely. Start with light weights and focus on form to build strength and confidence gradually.

Q: How often should I do dumbbell workouts?
A: 2–4 times per week is ideal, depending on your goals and recovery ability.

Q: Are dumbbells good for weight loss?
A: Yes. High-rep circuits boost metabolism and burn calories, supporting fat loss.

Q: What size dumbbells should I start with?
A: Start with 5–10 lbs for upper body and 10–20 lbs for lower body, adjusting as needed.

Conclusion

Dumbbell exercises are scientifically proven to improve strength, balance, coordination, and muscle growth. Their flexibility, safety, and efficiency make them a key tool in any workout plan. Whether you’re building muscle, losing weight, or enhancing mobility, dumbbells provide a reliable, science-backed path to fitness success.

Best Gym Near Manhattan in New York​

Manhattan, New York, is a hub for fitness enthusiasts, offering a diverse array of gyms to suit every preference and budget. From high-end wellness clubs to budget-friendly fitness centers, the city caters to all. Whether you’re seeking personalized training, group classes, or specialized equipment, Manhattan’s fitness scene has something for everyone.

Gym Near Manhattan New York

Equinox East 63rd Street

Equinox East 63rd Street offers a luxurious fitness experience with state-of-the-art equipment, diverse classes, and a spa. Known for its upscale amenities and professional trainers, it’s ideal for those seeking a premium workout environment.

Equinox East 63rd Street

Planet Fitness Manhattan (27th Street)

Planet Fitness on 27th Street provides a welcoming, judgment-free environment with a variety of equipment and amenities, including massage chairs and tanning. It’s perfect for those seeking affordability without compromising on quality.

planet fitness manhattan

Blink Fitness

Blink Fitness offers a clean, modern space with a variety of equipment and classes at an affordable price. With multiple locations across Manhattan, new york. It’s convenient for those on the go.

blink fitness manhattan ny

How to Choose the Right Resistance Band for Your Workout

How to Choose the Right Resistance Band for Your Workout

Resistance bands have become a staple in fitness routines due to their versatility, affordability, and effectiveness. Whether you’re a beginner looking to enhance your workouts or an experienced athlete aiming to add variety to your training, then this article will help how to choose the right resistance band for your workout. 

With different types, resistance levels, and materials available, selecting the best one for your needs can be overwhelming. This guide will help you make an informed decision to optimize your workouts.

Understanding Different Types of Resistance Bands

When it comes to choosing the right resistance band for workouts you need to know about different types of resistance bands and how it works. Each type of resistance band is different for various types of exercises. So, here are some Bands you need to understand before choosing. 

Resistance Band workout
Different Types of Resistance Bands

1. Loop Bands

Loop bands, also known as mini bands or hip bands, form a continuous loop and are commonly used for lower-body exercises such as squats, lunges, and glute bridges. They come in different resistance levels and can be used for rehabilitation and activation drills.

2. Tube Bands with Handles

Tube bands are long, cylindrical resistance bands that often come with handles. They are ideal for strength training exercises that mimic free-weight movements, such as bicep curls, shoulder presses, and rows.

3. Therapy Bands

These flat, stretchable bands are typically used in physical therapy and rehabilitation settings. They provide gentle resistance, making them ideal for beginners, seniors, and individuals recovering from injuries.

4. Figure-8 Bands

These bands have a shape resembling the number 8 and feature handles on each end. They are excellent for upper-body exercises like chest presses, shoulder raises, and triceps extensions.

5. Pull-Up Assist Bands

Pull-up assist bands are long, thick bands designed to help users perform pull-ups by providing counter-resistance. They can also be used for mobility exercises and advanced strength training.

6. Fabric Bands

Fabric resistance bands offer more durability and comfort than traditional latex bands. They do not roll up or snap easily, making them ideal for lower-body exercises.

How to Choose the Right Resistance Band for Your Workout

After knowing about the types of resistance bands and their differences now it is time to understand the factors of resistance bands. Here’s a detailed guide on how to choose the right resistance bands for your workout based on key factors: 

1. Resistance Level

Resistance bands come in different levels of tension, usually categorized by color. While the specific color coding varies by brand, here’s a general guideline:

  • Light (Yellow, Red, or Green): Best for beginners, rehabilitation, and mobility work. These bands provide minimal resistance, making them ideal for warm-ups, stretching, and gentle strength training.
  • Medium (Blue, Green, or Purple): Suitable for intermediate users looking to increase strength. These bands offer moderate resistance, helping to build muscle without excessive strain.
  • Heavy (Black, Purple, or Gray): Designed for advanced users and those engaging in strength training. They provide significant resistance, making exercises more challenging.
  • Extra-Heavy (Gray or Gold): Intended for powerlifters and experienced athletes who require maximum resistance. These bands are great for high-intensity training, explosive movements, and powerlifting support.

It’s essential to select a resistance level that challenges your muscles without compromising proper form. If unsure, starting with a medium band and progressing as needed is a good approach.

2. Material

Resistance bands are made from different materials, each offering unique benefits:

  • Latex or Rubber: These bands are the most common and offer excellent elasticity, making them ideal for dynamic movements. However, they can sometimes roll or pinch during exercises.
  • Fabric: Fabric bands provide better stability, don’t roll up, and are more comfortable, especially for lower-body exercises like squats and hip thrusts. They also offer a firmer resistance level.
  • Non-Latex Options: If you have a latex allergy, opt for non-latex rubber or fabric bands to avoid irritation.

Choosing the right material depends on personal preference and the type of workout you plan to do.

3. Length and Size

The length of a resistance band affects the range of motion and exercise variety:

  • Short Bands: Typically used for lower-body exercises, such as glute activation, hip thrusts, and lateral walks.
  • Long Bands: More versatile and suitable for full-body workouts, including upper-body strength exercises, squats, deadlifts, and assisted pull-ups.
  • Loop Bands vs. Open Bands: Loop bands form a continuous circle and are great for resistance training, while open-ended bands (sometimes with handles) are better for full-body workouts and rehabilitation.

Choosing the right size depends on your workout style and the exercises you plan to perform.

4. Portability and Storage

One of the biggest advantages of resistance bands is their portability. They are lightweight, easy to carry, and perfect for home workouts, gym sessions, or travel. Some resistance band sets come with a carrying pouch, making storage and transport more convenient. If you frequently travel or prefer a compact workout tool, consider investing in a set that includes multiple resistance levels in a compact form.

5. Versatility

To get the most out of resistance bands, choose a set that allows you to perform a variety of exercises. Look for:

  • Multiple Resistance Levels: A set with different tension levels lets you progress gradually and target various muscle groups.
  • Handles: Some bands come with detachable handles, making them easier to grip for upper-body exercises.
  • Door Anchors: These allow you to attach the band to a door, expanding the range of exercises you can perform.
  • Ankle Straps: Useful for lower-body exercises like leg lifts and glute kickbacks.

Investing in a versatile resistance band set ensures you can perform strength training, mobility work, and flexibility exercises effectively.

Matching Resistance Bands with Your Workout Goals

Choosing the right resistance band depends on your fitness objectives. For rehabilitation and mobility, opt for light bands to aid recovery and improve flexibility. For muscle toning and endurance, medium resistance bands provide the right balance of challenge and control.

For strength training and muscle building, heavy and extra-heavy bands help create progressive resistance for increased muscle activation. If you’re focusing on functional training or sports performance, a variety of resistance levels with accessories like door anchors and ankle straps can enhance your workout. Selecting the right band ensures you maximize effectiveness while maintaining proper form.

1. Strength Training

Opt for tube bands with handles or pull-up assist bands for building muscle. These provide enough resistance to mimic free-weight exercises and progressive overload.

2. Rehabilitation and Physical Therapy

Therapy bands or light resistance bands are best for recovery exercises, gentle stretching, and improving mobility.

3. Mobility and Warm-Ups

Loop bands and light therapy bands help activate muscles, improve flexibility, and warm up the body before intense workouts.

4. Weight Loss and Toning

Medium-resistance loop and tube bands work well for high-rep, low-rest workouts aimed at fat loss and toning. They allow for dynamic exercises that keep the heart rate elevated.

5. Athletic Performance and Speed Training

Athletes benefit from heavy resistance bands for explosive movements, agility drills, and sport-specific training.

How to Use Resistance Bands Safely and Effectively

To use resistance bands safely and effectively, always start with the proper form and choose the right resistance level to avoid strain. Secure the band to a stable surface or anchor point when needed to prevent snapping. Control your movements—avoid rapid or jerky motions to maintain tension and prevent injuries. Regularly inspect your bands for wear and tear, as damaged bands can break unexpectedly. Engage your core and maintain consistent tension throughout each exercise for maximum effectiveness. Lastly, progress gradually by increasing resistance as your strength improves to prevent overexertion.

1. Check for Wear and Tear

Inspect your bands regularly for any signs of damage, such as tears or thinning, to prevent snapping and injuries.

2. Secure Your Band Properly

When anchoring your band to a door, pole, or other objects, ensure it’s secure to avoid accidents.

3. Control Your Movements

Avoid rapid snapping or letting the band recoil uncontrollably. Maintain tension throughout the movement for optimal results.

4. Progress Gradually

Start with a lighter resistance band and progress to heavier resistance as you build strength.

5. Use Proper Form

Just like with free weights, improper form can lead to injuries. Engage the correct muscles and maintain good posture.

Frequently Asked Questions

1. How do I know which resistance level to start with?

Beginners should start with light resistance and gradually increase as they gain strength. A good rule of thumb is to choose a band that allows 10-15 reps with moderate difficulty.

2. Can resistance bands replace weights?

While resistance bands can mimic many weightlifting exercises, they may not completely replace heavy weights for advanced strength training. However, they are excellent for functional training and muscle endurance.

3. Are resistance bands effective for muscle building?

Yes! Resistance bands create constant tension on muscles, leading to strength and muscle growth, especially when used with progressive overload principles.

4. How long do resistance bands last?

The lifespan depends on the quality and frequency of use. With proper care, high-quality resistance bands can last several years.

5. Are fabric or latex bands better?

Fabric bands are more durable and comfortable, while latex bands offer more stretchability. Your choice depends on preference and workout needs.

Conclusion

Choosing the right resistance band depends on your fitness goals, experience level, and exercise preferences. By understanding the different types, resistance levels, and materials, you can select the best band to enhance your workouts. Whether you’re focusing on strength training, rehabilitation, or general fitness, resistance bands offer an effective, affordable, and portable solution to improve your exercise routine.

Best Resistance Band Exercises for Complete Beginners

Best Resistance Band Exercises for Beginners

Resistance bands are a fantastic way to build strength, improve flexibility, and enhance overall fitness, Best Resistance Band Exercises for Beginners— without the need for heavy equipment or a gym membership. 

These simple yet effective tools can help you achieve a full-body workout with minimal space and investment. Whether you want to tone muscles, improve mobility, or rehabilitate after an injury, resistance bands provide a low-impact way to reach your fitness goals.

One of the biggest advantages of resistance bands is their versatility. They come in different resistance levels, allowing you to progress at your own pace. They are also lightweight and portable, making them a convenient option for home workouts, travel, or even quick exercise breaks throughout the day. Additionally, they engage stabilizing muscles more effectively than traditional weights, leading to better balance and coordination over time.

If you’re new to resistance training, these exercises will help you get started safely and effectively. By incorporating these movements into your routine, you can gradually build strength, improve endurance, and develop a well-rounded fitness foundation.

resistance band banner

Why Use Resistance Bands?

Resistance bands are lightweight, portable, and versatile. Unlike free weights, they provide constant tension throughout each movement, which helps improve muscle activation and endurance. They’re also great for beginners because they offer a lower injury risk than free weights while still allowing for progressive overload as you get stronger. Additionally, resistance bands come in various resistance levels, making them suitable for all fitness levels.

If you’re new to resistance training, these exercises will help you get started safely and effectively. By incorporating these movements into your routine, you can gradually build strength, improve endurance, and develop a well-rounded fitness foundation.

Best Resistance Band Exercises for Beginners

1. Squats

Muscles Worked: Glutes, quads, hamstrings

How to Do It:

  • Stand with your feet shoulder-width apart, with the resistance band looped under both feet.
  • Hold the ends of the band at shoulder height or keep them by your sides.
  • Lower your body into a squat position by bending your knees and pushing your hips back.
  • Keep your chest up and ensure your knees do not extend past your toes.
  • Push through your heels to return to the starting position.
  • Repeat for 10-15 reps.

Benefits: This exercise strengthens your lower body while also improving balance and coordination. Adding a resistance band increases muscle engagement throughout the squat movement.

2. Banded Rows

Muscles Worked: Back, shoulders, biceps

How to Do It:

  • Secure the resistance band around a sturdy anchor (such as a doorknob or a post) or step on it with both feet.
  • Hold the ends of the band with your palms facing each other, keeping your arms extended in front of you.
  • Pull the band towards your torso by squeezing your shoulder blades together and bending your elbows.
  • Hold for a second at the peak of the movement, then slowly return to the starting position.
  • Perform 10-12 reps.

Benefits: This exercise helps improve posture and strengthens the upper back, making it ideal for counteracting the effects of prolonged sitting.

3. Shoulder Press

Muscles Worked: Shoulders, triceps

How to Do It:

  • Stand on the resistance band with your feet hip-width apart.
  • Hold the band at shoulder height with your palms facing forward.
  • Press the band overhead until your arms are fully extended.
  • Lower back down to the starting position with control.
  • Repeat for 10-12 reps.

Benefits: The shoulder press is an excellent exercise for building upper body strength and improving shoulder stability. The resistance band ensures continuous tension, maximizing muscle activation.

4. Bicep Curls

Muscles Worked: Biceps

How to Do It:

  • Stand with your feet hip-width apart on the resistance band.
  • Hold the ends of the band with your palms facing forward.
  • Keep your elbows close to your body and curl your hands towards your shoulders.
  • Squeeze your biceps at the top and then slowly lower back to the starting position.
  • Perform 10-15 reps.

Benefits: This exercise effectively targets the biceps, helping to build arm strength and definition over time.

5. Lateral Band Walks

Muscles Worked: Glutes, thighs

How to Do It:

  • Place a looped resistance band around your thighs just above your knees.
  • Stand in a half-squat position with feet hip-width apart, keeping tension in the band.
  • Take small steps to the side while maintaining tension on the band.
  • Perform 10-15 steps in each direction.

Benefits: This exercise strengthens the glutes and hip stabilizers, which can help prevent knee and lower back pain.

6. Glute Bridges

Best Resistance Bands For Glutes Reviews

Muscles Worked: Glutes, hamstrings

How to Do It:

  • Lie on your back with your knees bent and feet flat on the floor.
  • Place a resistance band above your knees.
  • Engage your core and press your heels into the floor as you lift your hips toward the ceiling.
  • Squeeze your glutes at the top, then slowly lower back down.
  • Perform 12-15 reps.

Benefits: Glute bridges help strengthen the posterior chain, improve hip mobility, and enhance overall lower body power.

Key Benefits of Resistance Bands:

Exercise always helps reduce body fat and keep your body fit and healthy. So, as a beginner, resistance band exercises are the best option. Here are some key benefits of resistance bands. 

1. Strength Training

Resistance bands are highly effective for building and toning muscles. They provide resistance throughout the entire range of motion, ensuring continuous muscle engagement.

2. Injury Prevention & Rehabilitation

Resistance bands are a staple in physical therapy and rehabilitation due to their gentle but effective way of strengthening muscles without stressing injured joints or tissues. 

3. Portability & Convenience

One of the biggest advantages of resistance bands is their portability. Weighing very little and taking up minimal space, they can be easily packed in a bag or suitcase, making them a fantastic choice for those who travel often or have limited space at home. 

4. Joint-Friendly Workouts

Resistance bands offer a much gentler alternative to traditional free weights, which can place a significant strain on joints, especially during high-impact or heavy-lifting exercises

5. Progressive Resistance

Unlike free weights, which offer fixed increments in resistance, resistance bands offer a more gradual and flexible way to increase resistance. 

6. Versatility

Resistance bands are incredibly versatile, offering a wide range of uses that go beyond just strength training. They can be incorporated into flexibility routines, improving range of motion and mobility, especially in tight areas like the hips, shoulders, and hamstrings.

In short, resistance bands provide numerous benefits that make them a valuable addition to any fitness routine. Whether you’re building muscle, rehabilitating an injury, or simply looking for a portable and joint-friendly workout option, resistance bands offer an effective, adaptable solution to meet your needs.

Tips for Success

  • Start with a light resistance band and gradually increase tension as you get stronger.
  • Focus on proper form to prevent injuries and maximize effectiveness.
  • Perform exercises slowly and with control to engage muscles fully and prevent momentum from taking over.
  • Incorporate these exercises into a full-body workout routine for balanced strength and flexibility gains.

Conclusion

Incorporating resistance bands into your fitness regimen is a practical and efficient way to enhance strength, flexibility, and overall well-being. Their adaptability allows for gradual progression, making them an excellent choice for beginners and seasoned athletes alike. 

Whether you are training at home, on the go, or in a gym, resistance bands offer a low-impact yet highly effective method to achieve your fitness goals. By following a consistent routine and focusing on proper technique, you can maximize the benefits of resistance training and foster long-term health and fitness improvements.

Best Resistance Band Exercises for Beginners and effective way to improve strength and flexibility. With these foundational exercises, you can build a solid fitness routine that helps you progress safely. 

Try incorporating them into your workouts and enjoy the benefits of resistance training from the comfort of your home!

FAQ

1. Are resistance bands effective for building muscle? 

Yes, resistance bands can help build muscle by providing constant tension throughout exercises, promoting muscle growth and strength development over time.

2. What resistance band should I start with as a beginner? 

Beginners should start with a light to medium resistance band to focus on proper form and gradually increase intensity as they progress.

3. Can resistance bands replace weights? 

While resistance bands are effective for strength training, they may not fully replace weights for advanced lifters. However, they are excellent for improving endurance, flexibility, and muscle activation.

4. How often should I use resistance bands? 

Aim to use resistance bands at least 3-5 times per week, incorporating them into strength training, mobility exercises, or stretching routines for optimal results.

5. Are resistance bands safe for all ages? 

Yes, resistance bands are a low-impact exercise option, making them suitable for individuals of all ages, including seniors and those recovering from injuries.

6. How do I maintain and care for my resistance bands? 

To extend their lifespan, store resistance bands in a cool, dry place away from direct sunlight, and inspect them regularly for any signs of wear or damage.

How Do Resistance Bands Work and How To Use

Resistance bands have gained immense popularity in the fitness world due to their versatility, effectiveness, and convenience. Whether you’re a beginner or an advanced athlete, these simple yet powerful tools can elevate your workouts. In this guide, we’ll explore what are resistance bands and how do resistance bands work, and also why they’re a must-have for anyone looking to improve strength and flexibility.

What Are Resistance Bands?

A resistance band is a flexible, elastic band used for strength training, rehabilitation, and fitness exercises. Made from latex or synthetic rubber, these bands provide varying levels of resistance to enhance muscle engagement without the need for heavy weights. 

They come in different thicknesses, colors, and resistance levels, allowing users to adjust intensity based on their fitness goals. Resistance bands are commonly used for stretching, physical therapy, strength training, and mobility exercises. Their lightweight and portable design makes them ideal for home workouts, travel, or gym use. They help improve flexibility, endurance, and muscle tone effectively and safely.

Type Of Resistance Bands

Resistance bands come in various shapes, sizes, and resistance levels, each serving different workout purposes and providing varying degrees of challenge. Here’s a closer look at the different types of resistance bands and their specific uses:

1. Loop Bands

Loop bands are continuous, circular bands that are commonly used for lower-body workouts and stretching exercises. Their closed-loop design allows for easy use in exercises like squats, lunges, glute bridges, and leg lifts. They are also great for targeting the hip abductors, glutes, and thighs, helping to improve strength, flexibility, and mobility. Loop bands come in different resistance levels (light, medium, heavy), allowing users to increase the challenge as they progress. These bands are ideal for glute and leg activation and are often used in warm-up routines or as an accessory in strength training exercises.

2. Tube Bands with Handles

Tube bands are cylindrical and have handles on both ends, providing a more traditional weight-training feel. The handles offer a secure grip, making these bands ideal for exercises like bicep curls, shoulder presses, chest presses, and rows. Tube bands are great for full-body workouts as they provide resistance in multiple directions and can be anchored to a door or other stable object. They are often more durable than flat bands and are typically used for upper-body and full-body strength training routines, simulating free-weight exercises while still offering a lower-impact alternative.

3. Therapy Bands

Therapy bands are flat, wide bands commonly used in rehabilitation and physical therapy settings. They are usually less resistant than other types of bands and provide a controlled, low-impact form of resistance, making them ideal for those recovering from injuries or surgeries. Therapy bands are used to assist with stretching, strengthening, and improving joint mobility, helping to rebuild strength gradually and safely. They can also help in managing chronic conditions like arthritis by promoting joint flexibility and muscle coordination. These bands are particularly useful for gentle exercises and rehab protocols that target specific muscle groups with minimal risk of injury.

4. Figure-8 Bands

Figure-8 bands are shaped like the number “8” and are shorter in length than other bands. They are perfect for upper body and arm exercises, as the design allows for more precise control and greater resistance on smaller muscle groups. Figure-8 bands are commonly used for exercises such as lateral raises, chest flies, tricep extensions, and shoulder presses. Their unique shape makes them easier to handle for upper body exercises, offering constant tension and helping to strengthen the arms, shoulders, and upper chest. These bands are ideal for those looking to target smaller muscle groups or perform exercises that mimic cable machine movements.

5. Fabric Bands

Fabric resistance bands are typically made from a blend of cotton, polyester, and elastic fibers, designed for added comfort, durability, and stretch. Unlike latex bands, fabric bands are less likely to snap or roll up during use, making them a great option for more intense or high-movement exercises. Fabric bands are particularly popular in glute and leg exercises such as squats, hip thrusts, and leg extensions. They are often used for workouts targeting the glute muscles due to their ability to stay in place during exercises like hip abductions and donkey kicks. Fabric bands are usually more durable and resistant to wear and tear compared to latex bands, making them a long-lasting choice for regular workouts. 

Each type of resistance band offers unique benefits, and incorporating a variety of bands into your fitness routine can help target different muscle groups, improve muscle engagement, and provide a well-rounded workout. Whether you’re strengthening, rehabilitating, or improving flexibility, resistance bands are versatile, affordable, and accessible tools that can enhance your fitness regimen.

How Do Resistance Bands Work?

Resistance bands work by creating external resistance that your muscles must work against when stretched. The further the band is stretched, the greater the resistance, making exercises progressively harder. Unlike traditional weights, which rely on gravity and often target muscles in a fixed range of motion, resistance bands provide continuous tension in multiple directions, enhancing muscle activation, stability, and control.

Since resistance bands are lightweight, portable, and adaptable to different fitness levels, they are excellent tools for home workouts, travel, and gym-based training. Whether used alone or in combination with free weights, they help improve strength, flexibility, and overall functional fitness.

1. Elastic Resistance

  • Unlike traditional weights, which rely on gravity, resistance bands create tension through their elastic material.
  • The more you stretch the band, the greater the resistance. This means that as you move through an exercise, the difficulty increases.
  • For example, in a bicep curl with a band, the movement becomes harder as you lift higher because the band stretches more.

2. Progressive Resistance & Overload

  • Resistance bands come in different tension levels: light, medium, heavy, and extra heavy.
  • You can progress by moving to a stronger band or increasing the stretch in the band.
  • This principle of progressive overload (gradually increasing resistance) helps in building strength over time, just like with weightlifting.

3. Constant Tension on Muscles

  • Free weights create resistance mostly in the upward or downward direction due to gravity, but bands provide resistance throughout the entire range of motion.
  • This continuous tension keeps muscles engaged for a longer period, improving endurance and strength.
  • For example, in a squat with a resistance band around the thighs, the band constantly works to pull your legs inward, forcing your muscles to work harder to maintain proper form.

4. Muscle Activation & Stabilization

  • Resistance bands require more stabilization from smaller muscle groups that might not be activated as much with machines or weights.
  • Since they allow movement in different directions (not just up and down), they improve balance and coordination.
  • This makes them ideal for sports training, injury prevention, and physical therapy.

5. Joint-Friendly & Safe for All Fitness Levels

  • Because bands don’t rely on gravity, they put less strain on joints compared to heavy weights.
  • This makes them perfect for people with joint pain, injuries, or those recovering from surgery.
  • They provide a controlled range of motion, reducing the risk of injury.

6. Versatility & Portability

  • Resistance bands can be used for a full-body workout, targeting different muscle groups (arms, legs, core, back, shoulders).
  • They are lightweight, compact, and easy to carry, making them ideal for home workouts, travel, and outdoor training.

7. Suitable for Rehabilitation & Flexibility Training

  • Many physical therapists use resistance bands to help patients recover from injuries by gradually strengthening weak muscles.
  • They are also great for improving flexibility through dynamic stretching exercises.
  • Example: Using a resistance band for hamstring stretches allows a deeper stretch without straining the muscle.

How to Use Resistance Bands in Your Workouts

Here are some effective exercises that you can try with resistance bands:

Upper Body Exercises:

  • Banded Shoulder Press: Step on the band, and press overhead.
  • Bicep Curls: Step on the band, and curl upwards.
  • Tricep Extensions: Secure the band above and extend your arms downwards.

Lower Body Exercises:

  • Squats: Place the band around your thighs and squat.
  • Lateral Band Walks: Step side-to-side with the band around your legs.
  • Glute Bridges: Place the band around your knees while lifting your hips.

Core & Stability Exercises:

  • Banded Russian Twists: Secure the band and twist side-to-side.
  • Standing Rotations: Attach the band and rotate your torso for core activation.
  • Leg Raises with Resistance Bands: Loop the band around your feet and lift your legs.

FAQ

  1. How long should a resistance band workout be?

A resistance band workout can last 15–45 minutes, depending on the intensity and exercises performed. Consistency is key to seeing progress!

  1. What are the benefits of using resistance bands?

Strengthens muscles by providing progressive resistance

Enhances flexibility and mobility through dynamic stretching

Improves balance and stability by engaging core muscles

Reduces joint strain compared to heavy weights

Portable and versatile for home, gym, or travel workouts.

3. Can resistance bands build muscle?

Yes! Resistance bands create enough tension to stimulate muscle growth. By progressively increasing resistance and incorporating different band strengths, they can build muscle-like weight training.

Final Thoughts

Resistance bands are an excellent addition to any fitness routine. They offer a safe, effective, and convenient way to build strength, improve flexibility, and enhance overall fitness. Whether you’re at home, traveling, or at the gym, these bands can help you reach your fitness goals without the need for heavy weights.

So, why not add resistance bands to your workout today? Your muscles will thank you! 

Resistance Bands vs Weights: Which Is Better for Your Fitness Goals?

Resistance Bands vs Weights

When it comes to strength training and fitness, choosing the right equipment can make a big difference in achieving your goals. Among the most popular options are resistance bands vs weights, each offering unique benefits depending on your fitness level, goals, and preferences. 

Choosing between resistance bands and weights ultimately depends on your fitness goals. If your primary focus is building strength and muscle mass quickly, weights may be the better choice. 

However, if you want a versatile, joint-friendly, and travel-friendly option, resistance bands can provide an effective and safe workout. In reality, incorporating both into your fitness routine can yield the best results by offering variety and targeting muscles in different ways.

Resistance Bands vs Weights

But which one is better for you? This article will teach us about resistance bands vs weights, which are better for your fitness goals and have health benefits. 

FeatureResistance BandsWeights
PortabilityLightweight and easy to carry, ideal for travelBulky and requires storage space
VersatilityCan be used for full-body workouts, rehabilitation, and flexibility trainingPrimarily used for strength training and muscle building
Resistance TypeProvides variable resistance throughout the movementOffers constant resistance with gravity-based load
Injury RiskLower impact on joints, reducing injury riskHigher risk of strain or improper form injuries
CostAffordable and accessibleCan be expensive, especially for high-quality weights
ProgressionResistance can be adjusted by using different bands or adjusting tensionAllows precise weight increments for progressive overload
Muscle ActivationEngages stabilizer muscles more due to continuous tensionBuilds strength with higher loads and controlled movements
Best ForFunctional fitness, mobility, rehabilitation, and home workoutsStrength building, bodybuilding, and powerlifting

Both resistance bands and weights have their advantages and can complement each other in a well-rounded fitness routine. The choice depends on your fitness goals, available space, and workout preferences.

Benefits of Resistance Bands: A Versatile and Portable Option

Resistance Bands
Resistance Bands
  1. Portable and Convenient 

Resistance bands are lightweight and easy to carry, making them perfect for travel and home workouts. Unlike bulky weights, they take up minimal space and can be stored easily in a bag or drawer. This makes them an excellent option for those who want to maintain their fitness routine while on the go.

  1. Versatile 

These bands can be used for a variety of exercises, including strength training, rehabilitation, mobility work, and flexibility training. They are effective for targeting different muscle groups, from the upper body to the lower body, allowing users to perform a full-body workout with a single piece of equipment.

  1. Joint-Friendly 

Resistance bands provide a lower-impact alternative to free weights, reducing the risk of strain on joints and tendons. The smooth and controlled resistance helps individuals recovering from injuries or those with joint pain perform exercises without excessive stress on their bodies.

  1. Variable Resistance 

Unlike traditional weights that rely on gravity, resistance bands create tension throughout the entire movement. This continuous resistance activates stabilizer muscles more effectively, improving balance, coordination, and functional strength.

  1. Affordable 

Compared to purchasing multiple sets of dumbbells or weight plates, resistance bands are much more cost-effective. A single set of resistance bands with varying resistance levels can replace an entire rack of free weights, making them an excellent option for budget-conscious fitness enthusiasts.

  1. Progressive Training 

Resistance bands come in different tension levels, allowing users to gradually increase the difficulty of their workouts. By using heavier bands or adjusting the band’s tension, individuals can progressively challenge their muscles and continue making strength gains without the need for heavy equipment.

  1. Improves Flexibility and Mobility 

Resistance bands are widely used for stretching and mobility exercises, making them ideal for warming up before workouts and aiding in recovery afterward. They help improve flexibility, range of motion, and muscle activation, which is beneficial for both athletes and individuals looking to maintain overall mobility.

  1. Suitable for All Fitness Levels 

Whether you’re a beginner or an advanced athlete, resistance bands provide scalable resistance options. Beginners can start with light resistance and gradually progress, while experienced fitness enthusiasts can use higher resistance levels to add intensity to their workouts.

Resistance bands offer a practical, efficient, and accessible way to enhance strength, flexibility, and endurance, making them an excellent addition to any fitness routine.

Benefit of Weights: Building Strength with Stability

Dumbbells, barbells, kettlebells, and machines—have been the cornerstone of strength training for years. They are used to target specific muscles by adding external resistance. Whether you’re lifting light weights for toning or heavy weights for muscle building, weights offer a straightforward and effective approach to building strength.

Benefits of Dumbbell Workouts
Weight Lifting
  1. Increases Muscle Mass and Strength 

Weight training is one of the most effective ways to build muscle mass and increase strength. By progressively overloading muscles with heavier weights, individuals can stimulate muscle growth and improve overall strength levels.

2. Enhances Bone Density 

Lifting weights helps increase bone density, reducing the risk of osteoporosis and fractures, especially in older adults. The stress placed on bones during resistance training encourages bone remodeling and growth.

3. Targets Specific Muscle Groups 

Free weights and machines allow for isolated exercises that focus on specific muscle groups. This is beneficial for bodybuilders and athletes who want to strengthen particular areas of their body.

4. Provides Consistent Resistance 

Unlike resistance bands, weights offer constant resistance throughout the movement, making it easier to measure progress and adjust intensity levels accurately.

5. Improves Stability and Coordination 

Lifting free weights engages stabilizer muscles, which are essential for balance and coordination. Exercises like squats, deadlifts, and bench presses require core engagement, leading to improved overall stability.

6. Supports Metabolic Rate and Fat Loss 

Strength training with weights increases muscle mass, which in turn boosts the body’s resting metabolic rate. This means that individuals burn more calories even when at rest, helping with long-term fat loss and weight management.

7. Enhances Athletic Performance 

Weight training improves power, endurance, and performance for athletes in various sports. Exercises that mimic real-life movements, such as deadlifts and lunges, enhance functional strength, which translates into better sports performance.

8. Allows for Progressive Overload 

With weights, individuals can increase resistance in small increments, ensuring continuous muscle growth and strength development. This makes it easier to track progress and set new strength goals over time.

9. Strengthens Joints and Connective Tissues 

Weightlifting not only strengthens muscles but also improves the health of tendons, ligaments, and joints. Stronger connective tissues help reduce the risk of injuries and improve overall joint stability.

10. Boosts Mental and Physical Endurance 

Lifting weights requires focus, determination, and consistency. Over time, it builds mental resilience, discipline, and confidence while also improving physical endurance and stamina.

By incorporating weight training into a fitness routine, individuals can experience long-term health benefits, including increased strength, better posture, enhanced mobility, and reduced risk of chronic conditions like osteoporosis and arthritis.

Resistance Bands vs Weights: Which One Should You Choose?

Choosing between Resistance Bands vs Weights comes down to your specific fitness goals, current fitness level, and personal preferences. Here’s a quick breakdown to help you decide:

  • For Beginners: Resistance bands are great for beginners who are new to strength training or those who want to focus on building endurance and flexibility. They offer a low-impact option that helps develop proper form and technique without the intimidation of heavyweights.
  • For Muscle Building: If your primary goal is to build muscle mass and strength, weights are your best option. The ability to progressively overload your muscles with weights is key to hypertrophy (muscle growth).
  • For Convenience and Portability: If you need a workout solution that’s easy to take anywhere or have limited space at home, resistance bands are a fantastic, lightweight choice.
  • For Joint Health: If you have joint concerns or are recovering from an injury, resistance bands can provide a safer, more forgiving way to strengthen muscles without putting too much strain on your joints.
  • For Well-Rounded Fitness: If you’re looking for a well-rounded workout that improves flexibility, strength, and endurance, you might find that combining both resistance bands and weights is the best approach.

Conclusion

There’s no one-size-fits-all answer to the resistance bands vs. weights debate. Both forms of training have their place in a well-rounded fitness routine. 

Resistance bands excel in versatility, portability, and joint-friendliness, making them ideal for people who want to enhance flexibility and overall fitness. 

On the other hand, weights are unmatched for building maximal strength and muscle mass, making them a go-to for anyone focused on hypertrophy or heavy lifting.

Ultimately, the best equipment for you depends on your individual goals and preferences. Why not incorporate both into your routine for a balanced approach to fitness that targets strength, flexibility, and endurance?

Frequently Asked Questions (FAQ)

1. Can resistance bands build muscle as effectively as weights?


Yes, resistance bands can build muscle effectively, especially for beginners and those focusing on endurance and functional strength. While weights provide a fixed resistance, bands offer variable resistance, which can enhance muscle engagement. However, for maximum muscle growth, free weights may be more effective due to the ability to progressively overload with heavier resistance.

2. Are resistance bands safe for people with joint pain or injuries?


Yes, resistance bands are often recommended for individuals with joint pain or those recovering from injuries. They provide low-impact resistance, reducing strain on joints while still allowing for effective muscle activation and rehabilitation exercises.

3. How do I choose the right resistance band for my fitness level?


Start with a lighter resistance band and gradually progress to heavier bands as you gain strength. Many bands are color-coded by resistance level, ranging from light (easier to stretch) to heavy (more resistance). If an exercise feels too easy, increase resistance or slow down movements for better muscle engagement.