
Last Updated on October 30, 2026 by Dorene Lambert
Editorial Note: The movement strategies, gait adjustments, and physical therapy principles outlined in this guide are for informational purposes. They do not replace formal clinical assessment, imaging, or physical therapy treatment plans from a licensed podiatrist or orthopedic doctor.
Walking with plantar fasciitis can feel like stepping directly onto a sharp nail the moment your heel contacts the floor in the morning. When the thick band of fibrous tissue that spans the underside of your foot becomes strained and irritated, every step pulls relentlessly at its calcaneal attachment.
However, complete bed rest is rarely the solution for tissue healing. While acute inflammation demands brief rest, active recovery through controlled, low-impact loading helps stimulate blood flow and re-align damaged collagen fibers. By understanding proper biomechanics, pacing your mileage, and using proven stretching protocols, walking with plantar fasciitis can transition from a painful setback into a structured pathway back to pain-free movement.
What Happens to the Plantar Fascia During a Walking Stride?
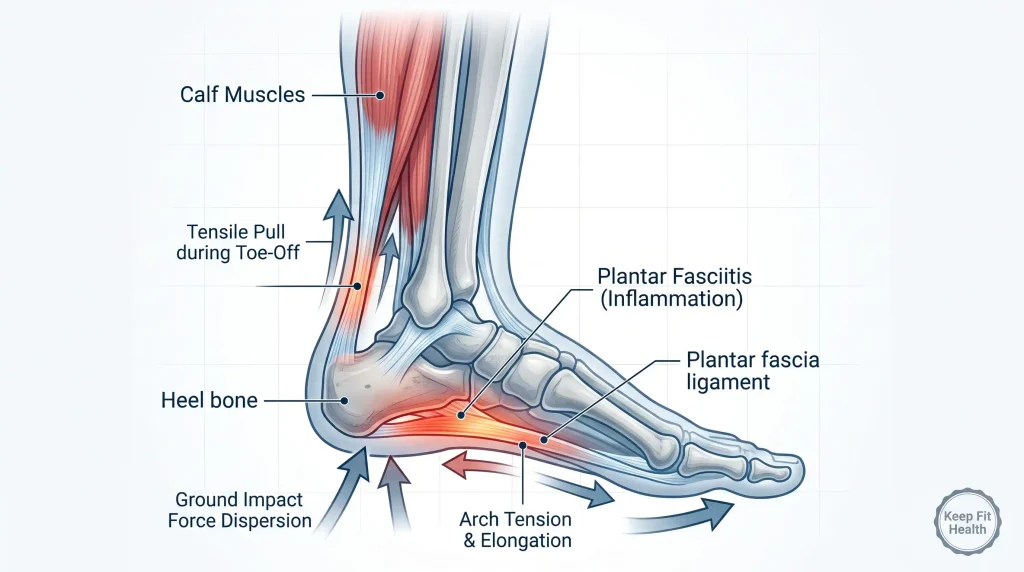
The plantar fascia is a dense, multilayered aponeurosis originating at the medial tubercle of the calcaneus (heel bone) and fanning out to attach to the proximal phalanges of each toe. It operates as a shock absorber and mechanical spring via the Windlass Mechanism.
The Windlass Mechanism Explained
During terminal stance and toe-off, your big toe naturally dorsiflexes (bends upward). This movement winds the plantar fascia tightly around the metatarsal heads, shortening the distance between your heel and forefoot:
- The Arch Elevates: The foot transforms from a flexible, shock-absorbing platform into a rigid lever capable of propelling you forward.
- Tension Peaks: If the tissue is chronically tight, micro-teared, or inflamed, this winding action generates intense tensile stress right at the heel bone.
- Secondary Kinetic Stress: If the foot arch collapses or overpronates—a frequent challenge for those seeking the best walking shoes for flat feet—the plantar fascia undergoes additional torsional twisting, delaying recovery.
Is Walking with Plantar Fasciitis Safe? (The Stop-Light Rule)
A common dilemma is whether to push through the discomfort or stop walking entirely. Complete immobilization leads to calf muscle atrophy, loss of ankle dorsiflexion, and stiffening of the plantar aponeurosis.
Use the Traffic Light Discomfort Scale to determine whether your walk is therapeutic or harmful:
1. Green Light (Safe to Continue)
- Discomfort Rating: 0 to 3 out of 10.
- Characteristics: Mild stiffness during the first 2 minutes of walking that eases as the foot warms up.
- Next-Day Check: Pain does not worsen the following morning.
2. Yellow Light (Proceed with Caution / Modify)
- Discomfort Rating: 4 to 5 out of 10.
- Characteristics: Dull ache present throughout the walk, but your gait mechanics remain symmetrical (you are not limping).
- Next-Day Check: Mild morning soreness that dissipates within 15 minutes of moving around. Shorten your distance by 25% for the next walk.
3. Red Light (Stop Immediately)
- Discomfort Rating: 6 out of 10 or higher.
- Characteristics: Sharp, stabbing, or radiating pain that causes you to alter your stride or limp on the outside of your foot.
- Next-Day Check: Severe throbbing or sharp morning pain that persists for hours. Cease fitness walks immediately and switch to non-weight-bearing cross-training (such as swimming or stationary cycling).
4 Biomechanical Gait Adjustments for Pain Relief
Adjusting your gait mechanics can decrease the repetitive percussive force on your rearfoot.
1. Shorten Your Stride and Increase Cadence
Overstriding occurs when you throw your leading foot far out in front of your pelvis. This creates a severe heel-strike braking force that channels shock directly into the plantar fascia origin.
- Correction: Shorten your stride length by roughly 10% to 15%. Aim for a cadence of 100 to 115 steps per minute.
- Result: Your foot lands closer beneath your center of mass, distributing landing impact evenly across the entire plantar surface rather than concentrating it solely on the heel.
2. Avoid Exaggerated Push-Off
Pushing off explosively from the balls of your feet engages the Windlass Mechanism under maximum mechanical load.
- Correction: Think of your feet as rolling wheels rather than springboards. Roll smoothly from midfoot to toe without forcing an aggressive drive off the big toe.
3. Maintain an Upright, Neutral Pelvis
Leaning backward or slumping into anterior pelvic tilt alters lower-extremity tracking and increases calf recruitment. Keep your core gently engaged, ribcage stacked over your pelvis, and gaze focused 15 to 20 feet ahead.
4. Choose Compliant Walking Surfaces
Avoid walking on concrete sidewalks, tiled floors, or hard-packed asphalt during the recovery phase.
- Opt For: Natural dirt trails, rubberized running tracks, or firm grass surfaces. These substrates provide greater shock compliance and reduce peak ground reaction forces on the heel pad.
5 Essential Stretches and Exercises to Restore Foot Health
A targeted daily physical therapy protocol helps remodel damaged fascia fibers, relieve tight calves, and strengthen intrinsic foot stabilizers.
1. Pre-Bed and Morning Big Toe Extension
Sit in a chair and cross your affected foot over the opposite knee.
- Grasp the base of your toes (especially the great toe) with your hand.
- Gently pull the toes back toward your shin until you feel a firm stretch along the arch of your foot.
- Use your opposite thumb to massage along the taut band in the arch from heel to toe.
- Hold for 30 seconds; repeat 3 times before taking your first steps in the morning.
2. Wall Gastrocnemius and Soleus Stretches
Tight calf muscles directly increase tensile strain on the Achilles tendon and plantar fascia.
- Gastrocnemius (Upper Calf): Stand facing a wall. Step your injured leg straight back with the heel flat on the floor and the knee extended straight. Lean forward into the wall until you feel a stretch in the upper calf. Hold for 30 seconds.
- Soleus (Lower Calf): Step into the same wall stretch, but bend both knees slightly while keeping the back heel firmly on the floor. This shifts tension downward to the deep soleus muscle. Hold for 30 seconds.
3. Frozen Water Bottle Arch Rolling
Combine gentle myofascial release with localized cryotherapy.
- Fill a standard plastic water bottle with water and freeze it solid.
- While seated in a chair, place the bottle under the arch of your bare foot.
- Roll your foot back and forth from the base of the toes to the front of the heel bone using light, controlled downward pressure.
- Continue for 5 to 7 minutes post-walk to reduce acute inflammatory heat.
4. Towel Curls for Intrinsic Muscle Strength
- Sit in a chair with bare feet flat on a smooth floor and place a hand towel beneath your feet.
- Using only your toes, scrunch and gather the towel toward your heel.
- Straighten the towel out and repeat for 3 complete sets.
- This exercise strengthens the flexor hallucis brevis and abductor hallucis muscles, helping your foot support its own arch without overstressing the fascia.
The Shoe Selection Matrix: Features That Protect the Arch
The footwear you wear around the house and on walking paths directly determines how much load reaches the calcaneus.
Critical Footwear Criteria
- Adequate Heel Elevation: Flat slippers, flip-flops, and low-drop shoes pull the posterior kinetic chain taut. Look for shoes with an 8 mm to 12 mm heel-to-toe drop to relax the calf-fascia interface.
- Rigid Midsole Shank: Grab your shoe and attempt to fold it in half. The shoe should bend easily at the ball of the foot (where your toes flex) but remain rigid through the arch. Shoes that bend in the middle provide inadequate support for damaged ligaments.
- Firm Heel Counter: Squeeze the back rim of the shoe. A sturdy heel cup cradles the calcaneal fat pad, keeping your natural cushioning directly under the bone.
- Cushioned Rocker Soles: Shoes with rockered geometries help roll your foot through terminal stance, reducing the dorsiflexion needed to complete a stride.
Never Walk Barefoot on Hard Floors
When managing active plantar fasciitis, avoid walking barefoot on hardwood, tile, or laminate flooring—even for quick trips to the kitchen. Wear structured recovery slides or supportive indoor shoes at all times to avoid acute heel strikes on unpadded surfaces.
Lifestyle Factors That Influence Tendon and Ligament Healing
Healing connective tissue requires systemic metabolic support alongside localized mechanical care.
1. Body Composition and Weight Management
Every additional pound of body mass multiplies mechanical ground impact forces during walking. Adopting a nutrient-dense, anti-inflammatory whole-food diet relieves ongoing compressive stress on the plantar fat pad and arch.
2. Systemic Micronutrient Sufficiency
Collagen synthesis and tissue repair depend on adequate levels of vitamin C, zinc, magnesium, and vitamin D. For women aiming to balance overall micronutrient intake to aid musculoskeletal recovery, reviewing our guide on best women’s multivitamins provides actionable criteria for finding clean, third-party certified formulas.
3. Night Splint Therapy
During sleep, your feet naturally relax into plantarflexion (pointing downward). In this shortened state, the plantar fascia begins repairing micro-tears overnight. When you take your first morning step, the tissue is abruptly stretched open, re-tearing the newly formed collagen. A soft night splint keeps the ankle held at a neutral 90-degree angle, allowing the tissue to heal in an elongated position and reducing morning pain.
Frequently Asked Questions
Can walking worsen plantar fasciitis?
Yes, if done without proper footwear, on hard surfaces, or through sharp pain. However, controlled walking at a slow pace on soft terrain, coupled with supportive shoes and a shortened stride, increases blood flow and prevents connective tissue contracture. Follow the Traffic Light scale to keep loading safe.
How long does it take for plantar fasciitis to resolve?
Most mild to moderate cases resolve within 6 to 18 weeks with consistent conservative management (stretching, footwear changes, and activity modification). Chronic cases with degenerative changes (plantar fasciosis) may take 6 to 12 months of structured physical therapy.
Should I apply ice or heat to my heel?
- Ice: Ideal after a walk or at the end of the day to numb sharp discomfort and calm localized inflammation.
- Heat: Most effective in the morning or prior to walking to warm up stiff muscle fibers and increase tissue elasticity.
When should I consult an orthopedic specialist?
Schedule a medical evaluation if you experience numbness or tingling in your toes (which may indicate tarsal tunnel syndrome), visible bruising, inability to bear weight on the heel, or if pain does not improve after 4 to 6 weeks of dedicated home rehabilitation.
Next Steps for Active Recovery
Recovering from heel pain does not require giving up your daily walks entirely. By adjusting your stride, avoiding barefoot walking on hard surfaces, and performing targeted morning calf and arch stretches, you can remain active while giving your body the conditions it needs to repair.
For additional condition-specific guidance, review our in-depth biomechanics analysis on walking shoes for flat feet, and follow Dorene Lambert on Facebook for weekly mobility routines and practical fitness coaching.